Upload Artifacts to JFrog
You can use the Upload Artifacts to JFrog Artifactory step in your CI pipelines to upload artifacts to JFrog Artifactory non-Docker registries. To upload artifacts to a JFrog Docker registry, you can use a script in a Run step.
You need:
- Access to a JFrog Artifactory instance with a non-Docker registry.
- A CI pipeline with a Build stage and steps that generate artifacts to upload, such as by running tests or building code. The steps you use depend on what artifacts you ultimately want to upload.
- A Harness Artifactory connector.
You can also upload artifacts to S3, upload artifacts to GCS, and upload artifacts to Sonatype Nexus. For other upload locations, including JFrog Docker registries, you can use a script in a Run step.
Add an Upload Artifacts to JFrog step
In your pipeline's Build stage, add an Upload Artifacts to JFrog Artifactory step and configure the settings accordingly.
Here is a YAML example of a minimum Upload Artifacts to JFrog Artifactory step.
              - step:
                  type: ArtifactoryUpload
                  name: ArtifactoryUpload_1
                  identifier: ArtifactoryUpload_1
                  spec:
                    connectorRef: YOUR_ARTIFACTORY_CONNECTOR_ID
                    target: groupId/artifactId/version
                    sourcePath: path/to/source
Upload Artifacts to JFrog step settings
The Upload Artifacts to JFrog Artifactory step has the following settings. Depending on the build infrastructure, some settings might be unavailable or optional. Settings specific to containers, such as Set Container Resources, are not applicable when using the step in a stage with VM or Harness Cloud build infrastructure.
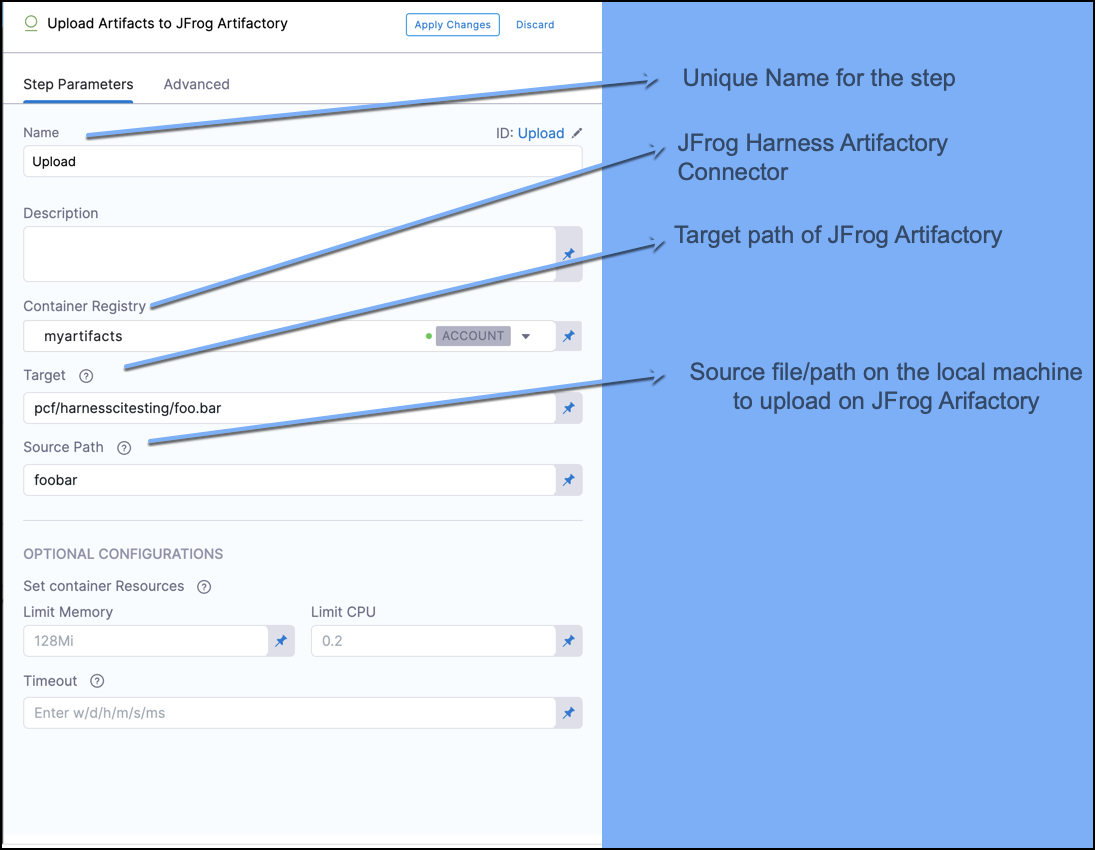
Name
Enter a name summarizing the step's purpose. Harness automatically assigns an Id (Entity Identifier Reference) based on the Name. You can change the Id.
Artifactory Connector
Select the Harness Artifactory connector to use for this upload. The JFrog Account associated with the connector must have read/write permission. For more information, go to the Artifactory connector settings reference.
This step supports Artifactory connectors that use either anonymous or username and password authentication.
If the connector uses username and password authentication, the PLUGIN_USERNAME and PLUGIN_PASSWORD used by this step are derived from the selected Artifactory connector.
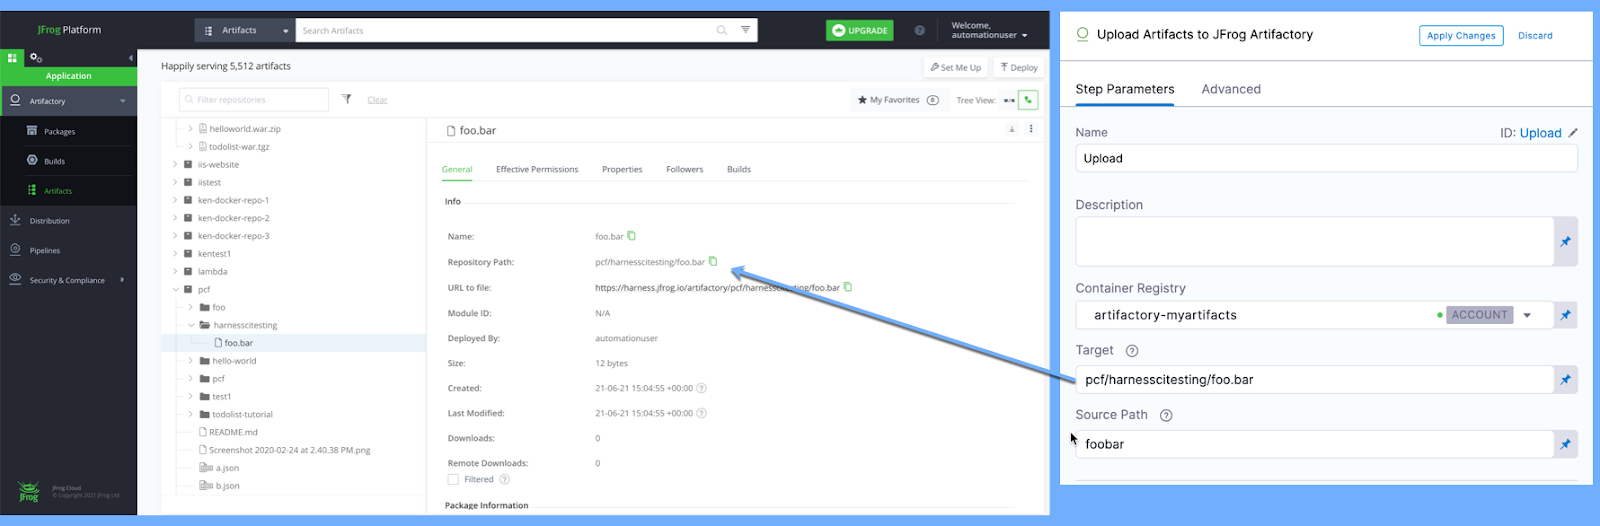
Target and Source Path
The Target is the target path in the JFrog Artifactory registry. This is a target repository name relative to the server URL in the connector. If pom.xml is not present, then the Target must be a full path to an artifacts folder, such as groupId/artifactId/version.
Source Path is a path to the artifact file/folder on the local/build machine you want to upload.
If you want to upload a compressed file, you must use a Run step to compress the artifact before uploading it.
Run as User
Specify the user ID to use to run all processes in the pod if running in containers. For more information, go to Set the security context for a pod.
Set container resources
Set maximum resource limits for the resources used by the container at runtime:
- Limit Memory: The maximum memory that the container can use. You can express memory as a plain integer or as a fixed-point number using the suffixes
GorM. You can also use the power-of-two equivalentsGiandMi. The default is500Mi. - Limit CPU: The maximum number of cores that the container can use. CPU limits are measured in CPU units. Fractional requests are allowed; for example, you can specify one hundred millicpu as
0.1or100m. The default is400m. For more information, go to Resource units in Kubernetes.
Timeout
Set the timeout limit for the step. Once the timeout limit is reached, the step fails and pipeline execution continues. To set skip conditions or failure handling for steps, go to:
View artifacts on the Artifacts tab
You can use the Artifact Metadata Publisher plugin to publish artifacts to the Artifacts tab. To do this, add a Plugin step after the Upload Artifacts to JFrog Artifactory step.
- Visual
- YAML
Configure the Plugin step settings as follows:
- Name: Enter a name.
- Container Registry: Select a Docker connector.
- Image: Enter
plugins/artifact-metadata-publisher. - Settings: Add the following two settings as key-value pairs.
file_urls: Provide a URL to the artifact that was uploaded in the Upload Artifacts to JFrog Artifactory step. If you uploaded multiple artifacts, you can provide a list of URLs.artifact_file: Provide any.txtfile name, such asartifact.txtorurl.txt. This is a required setting that Harness uses to store the artifact URL and display it on the Artifacts tab. This value is not the name of your uploaded artifact, and it has no relationship to the artifact object itself.
Add a Plugin step that uses the artifact-metadata-publisher plugin.
               - step:
                  type: Plugin
                  name: publish artifact metadata
                  identifier: publish_artifact_metadata
                  spec:
                    connectorRef: account.harnessImage
                    image: plugins/artifact-metadata-publisher
                    settings:
                      file_urls: https://complete/url/to/artifact/on/jfrog
                      artifact_file: artifact.txt
connectorRef: Use the built-in Docker connector (account.harness.Image) or specify your own Docker connector.image: Must beplugins/artifact-metadata-publisher.file_urls: Provide the URL to the artifact that was uploaded in the Upload Artifacts to JFrog Artifactory step. If you uploaded multiple artifacts, you can provide a list of URLs.artifact_file: Provide any.txtfile name, such asartifact.txtorurl.txt. This is a required setting that Harness uses to store the artifact URL and display it on the Artifacts tab. This value is not the name of your uploaded artifact, and it has no relationship to the artifact object itself.
Build logs and artifact files
When you run the pipeline, you can observe the step logs on the build details page.
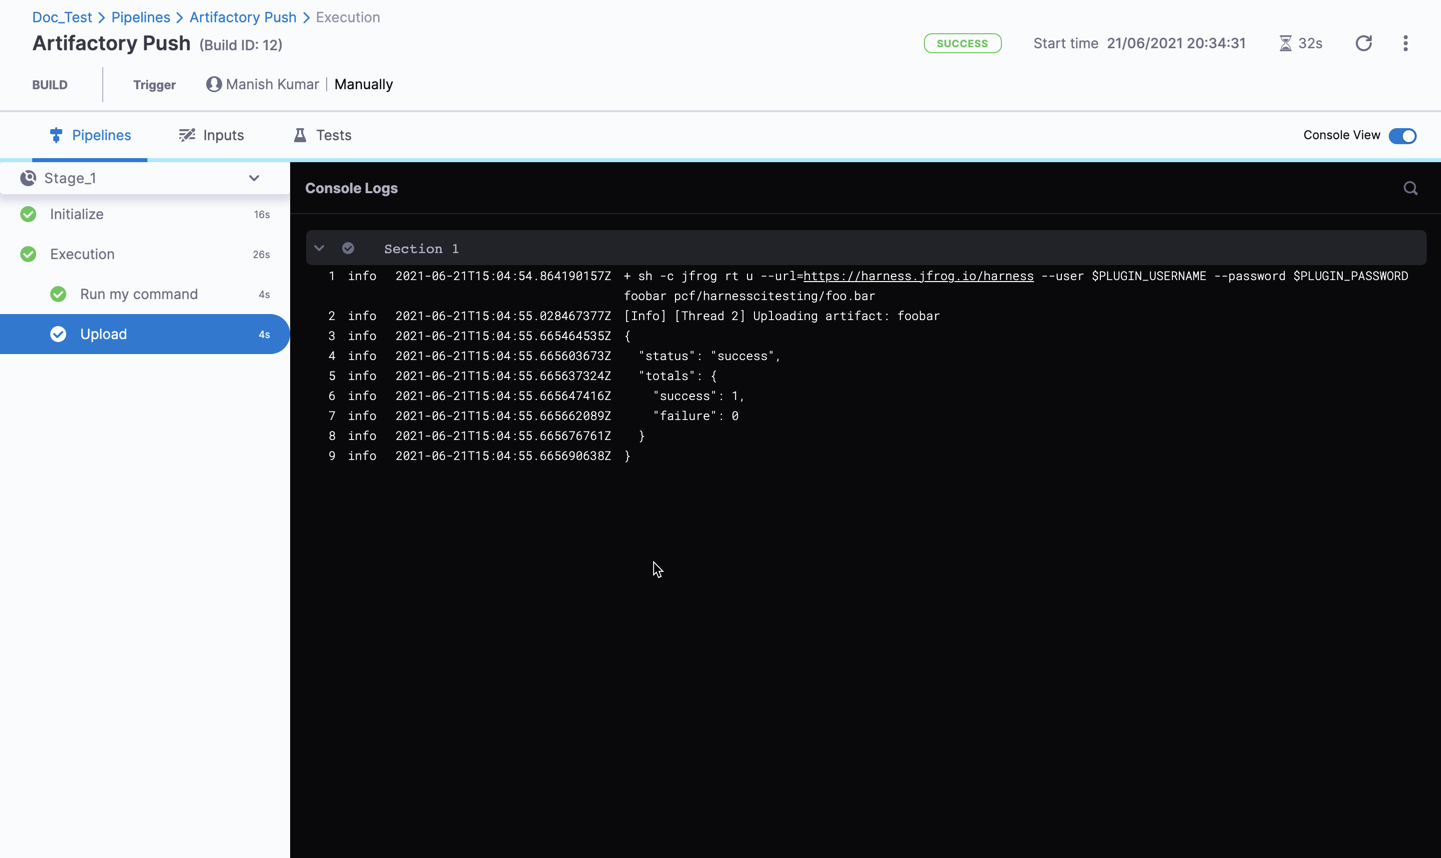
If the Upload Artifacts step succeeds, you can find the artifact in your JFrog repo.
If you used the Artifact Metadata Publisher, you can find a link to the artifact on the Artifacts tab.
On the Artifacts tab, select the step name to expand the list of artifact links associated with that step.
If your pipeline has multiple steps that upload artifacts, use the dropdown menu on the Artifacts tab to switch between lists of artifacts uploaded by different steps.

Troubleshoot uploading artifacts
Go to the CI Knowledge Base for questions and issues related uploading artifacts, such as: