IDP Stage
Introduction
Presently this Feature is behind the Feature Flag IDP_ENABLE_STAGE, please contact with Harness Support to enable it in your Account.
The self-service flow in IDP is powered by the Harness Pipelines. A stage is a part of a pipeline that contains the logic to perform a major segment of a larger workflow defined in a pipeline. Stages are often based on the different workflow milestones, such as building, approving, and delivering.
The process of adding a stage to a pipeline is the same for all Harness modules. When you add a stage to a pipeline, you select the stage type, such as Developer Portal for IDP or Build for CI or Deploy for CD. The available stage settings are determined by the stage type, and, if applicable, the module associated with the selected stage type.
This functionality is limited to the modules and settings that you have access to.
How to Add the Developer Portal Stage
- Present Nav
- New Nav
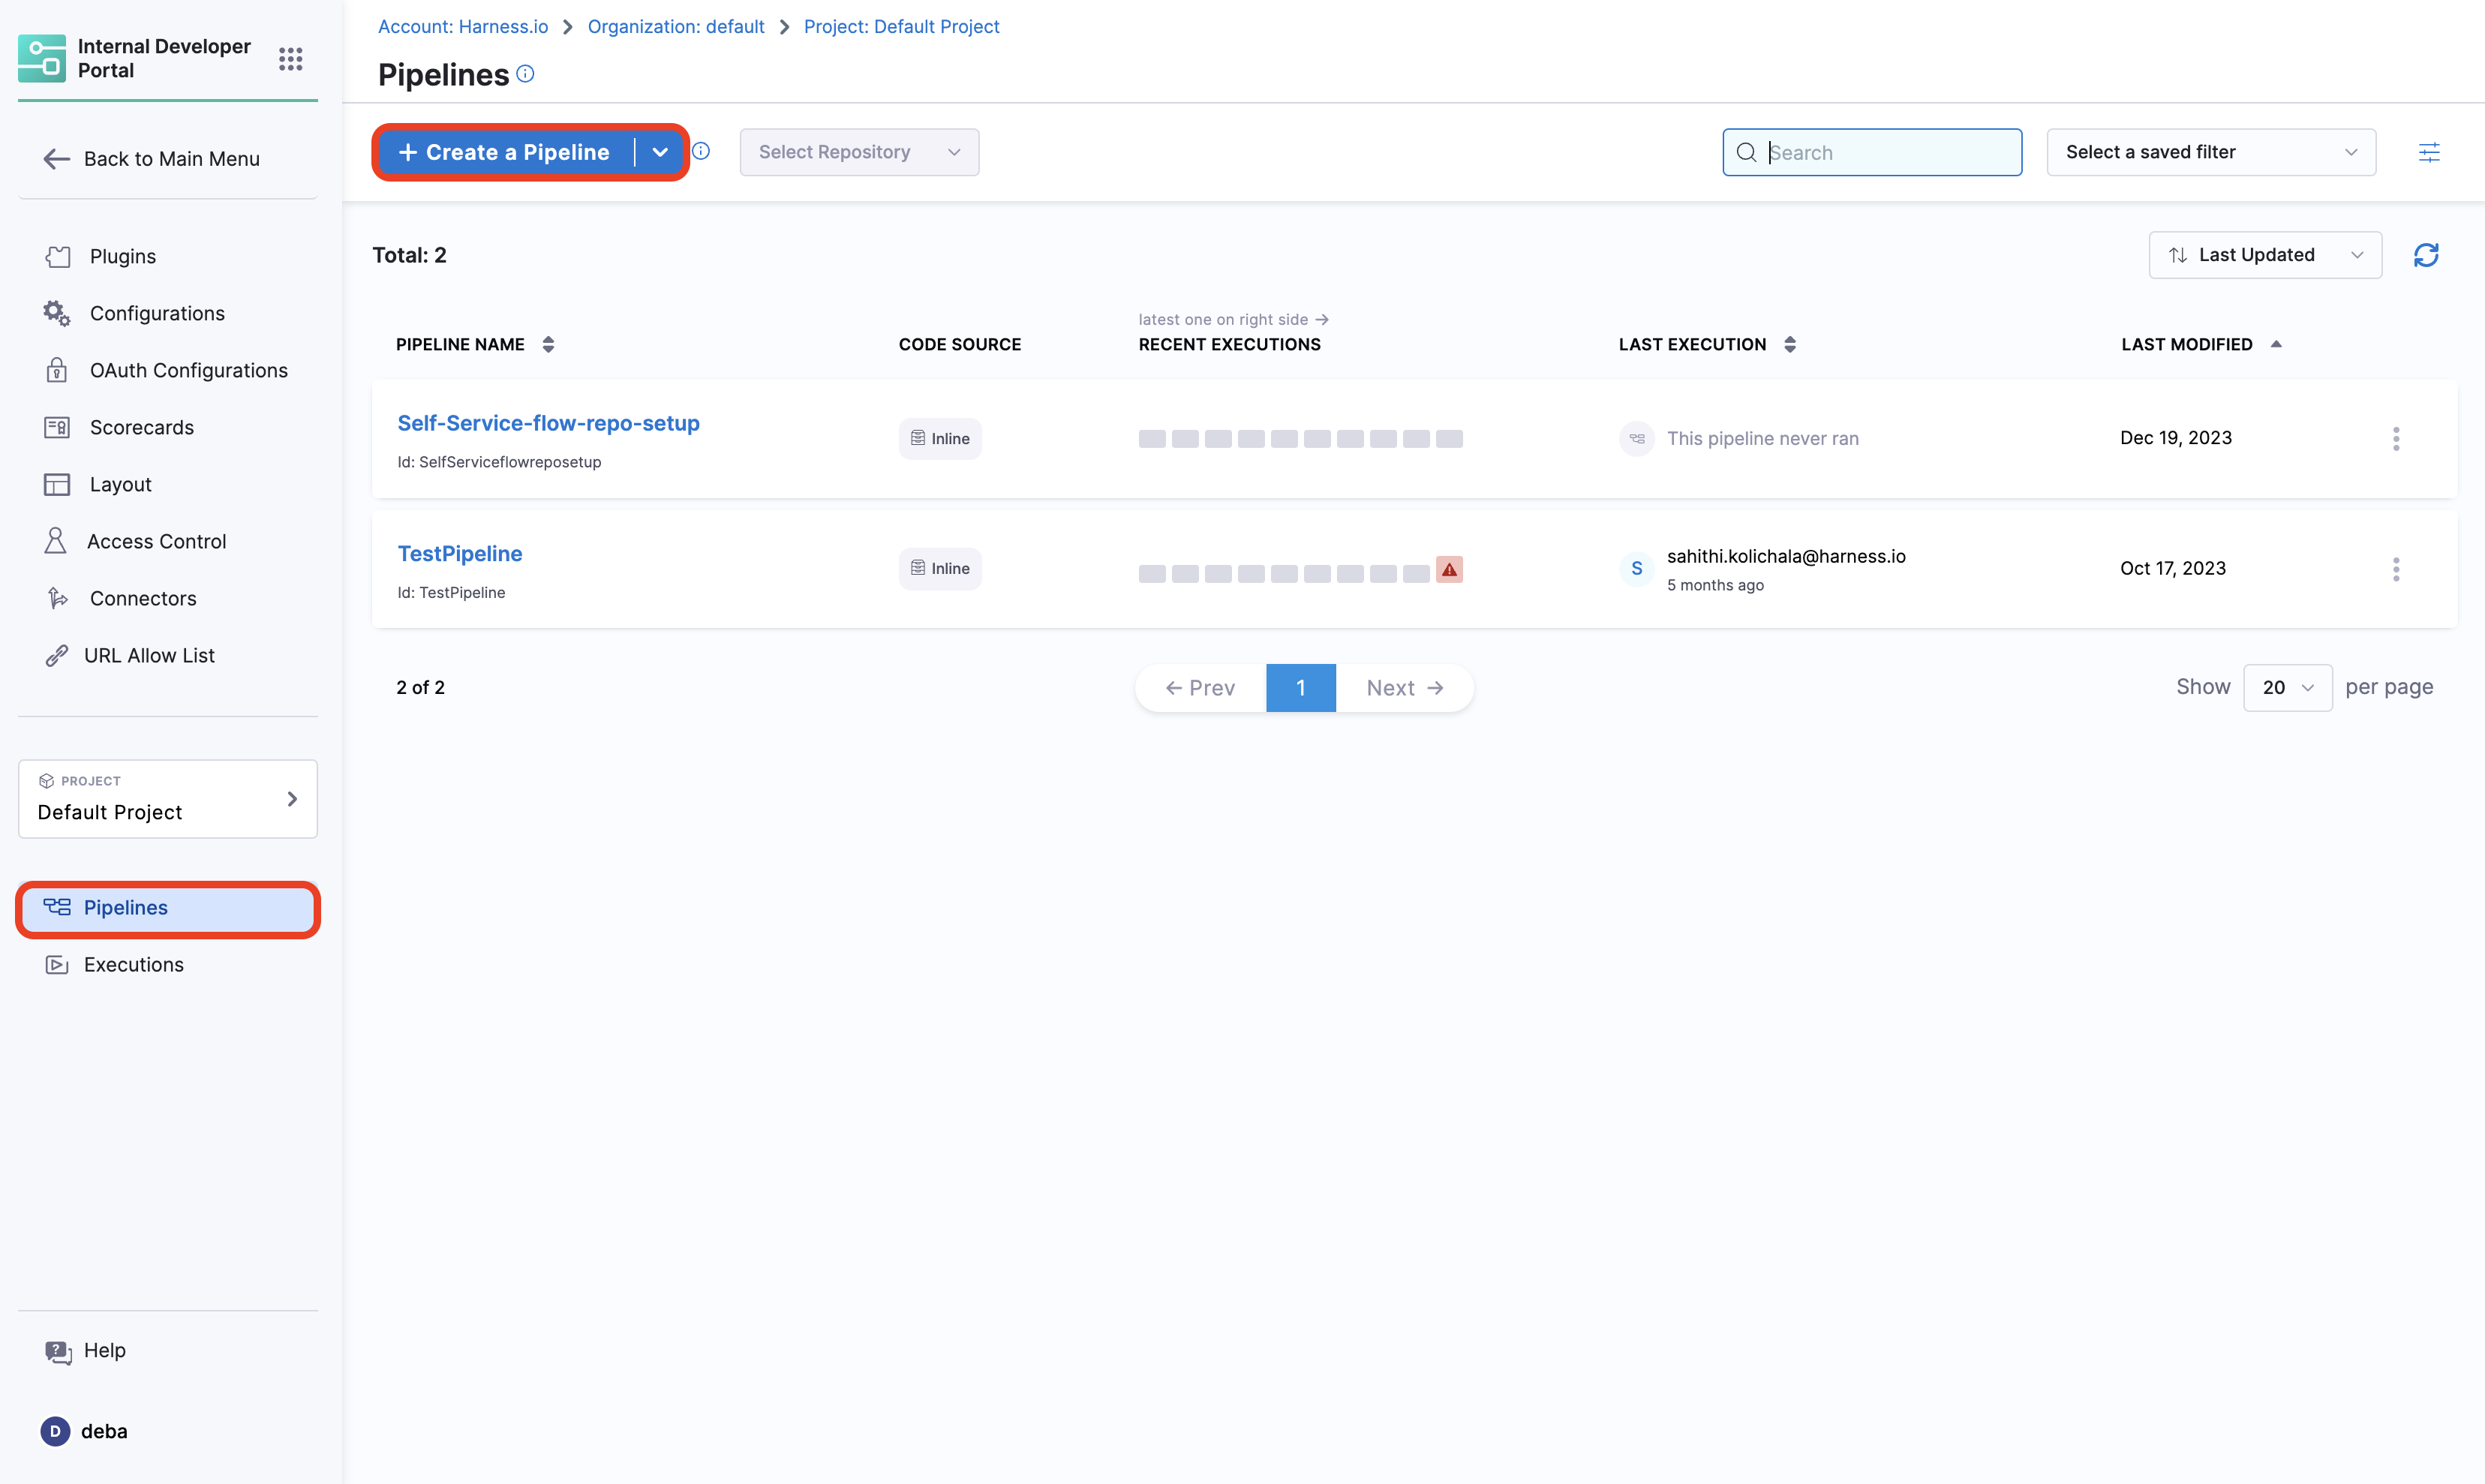
- Go to Projects and Select your project and create a new pipeline.
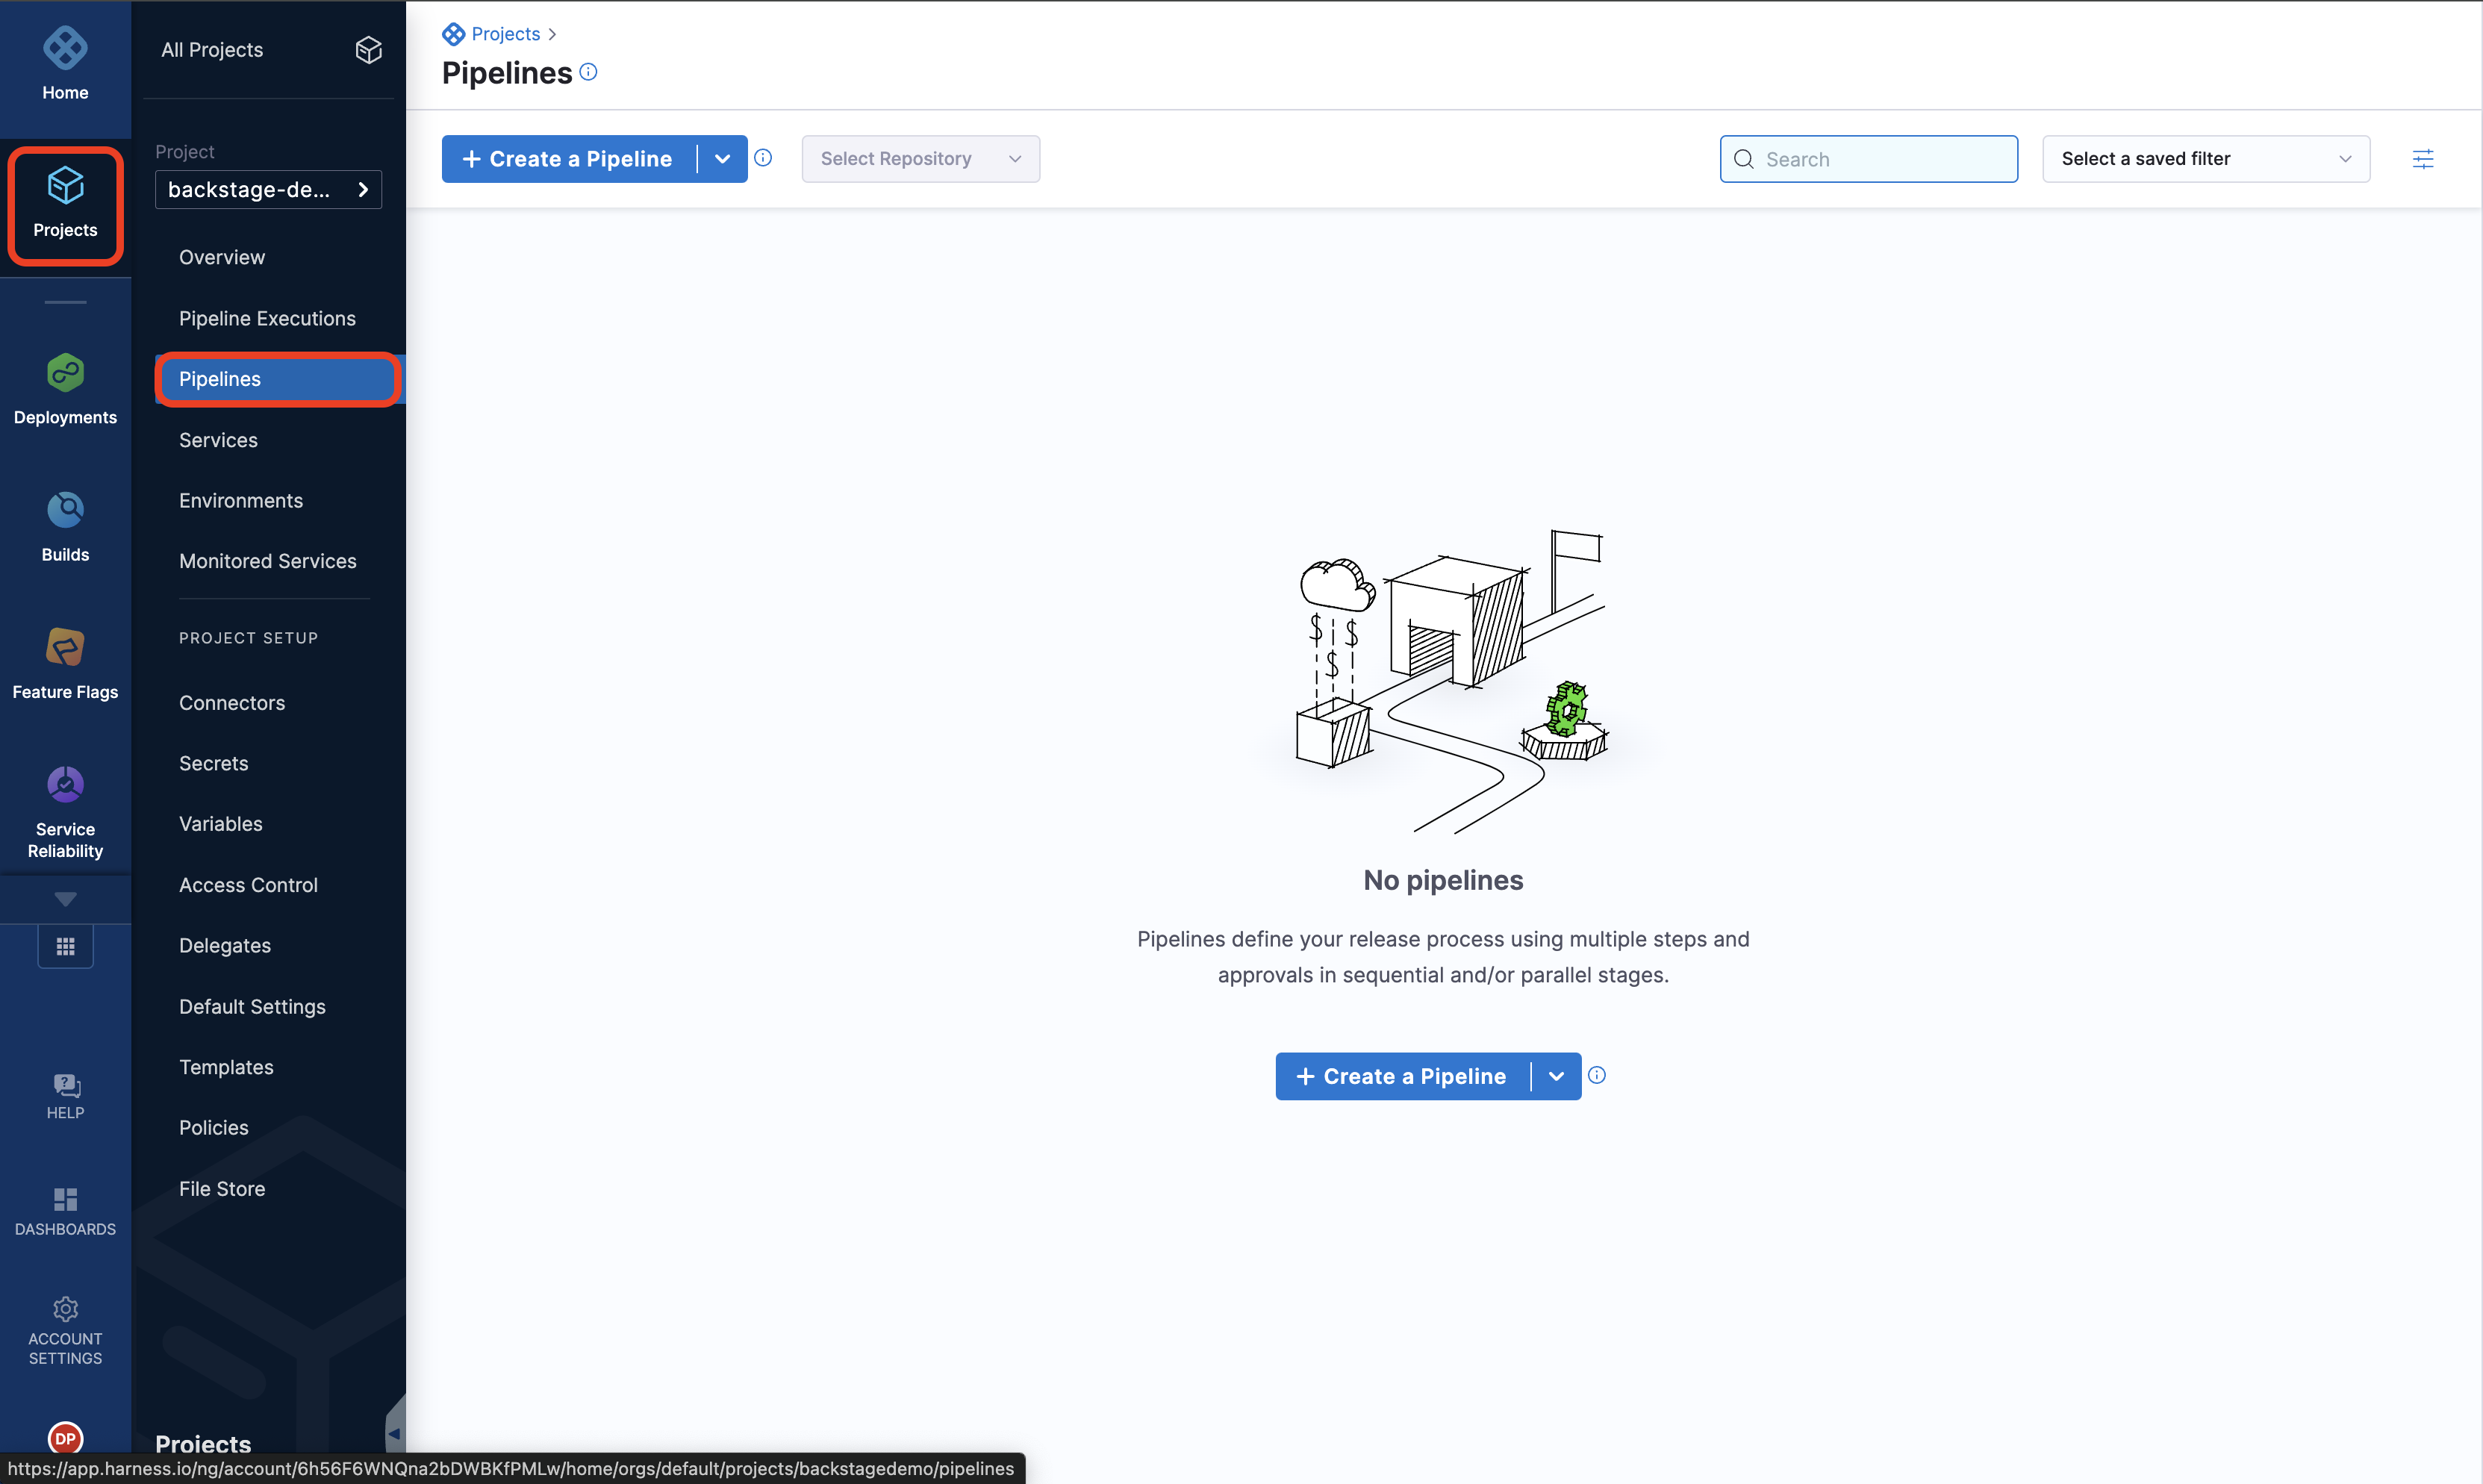
- Go to Pipelines under Admin from side nav and Create a Pipeline.
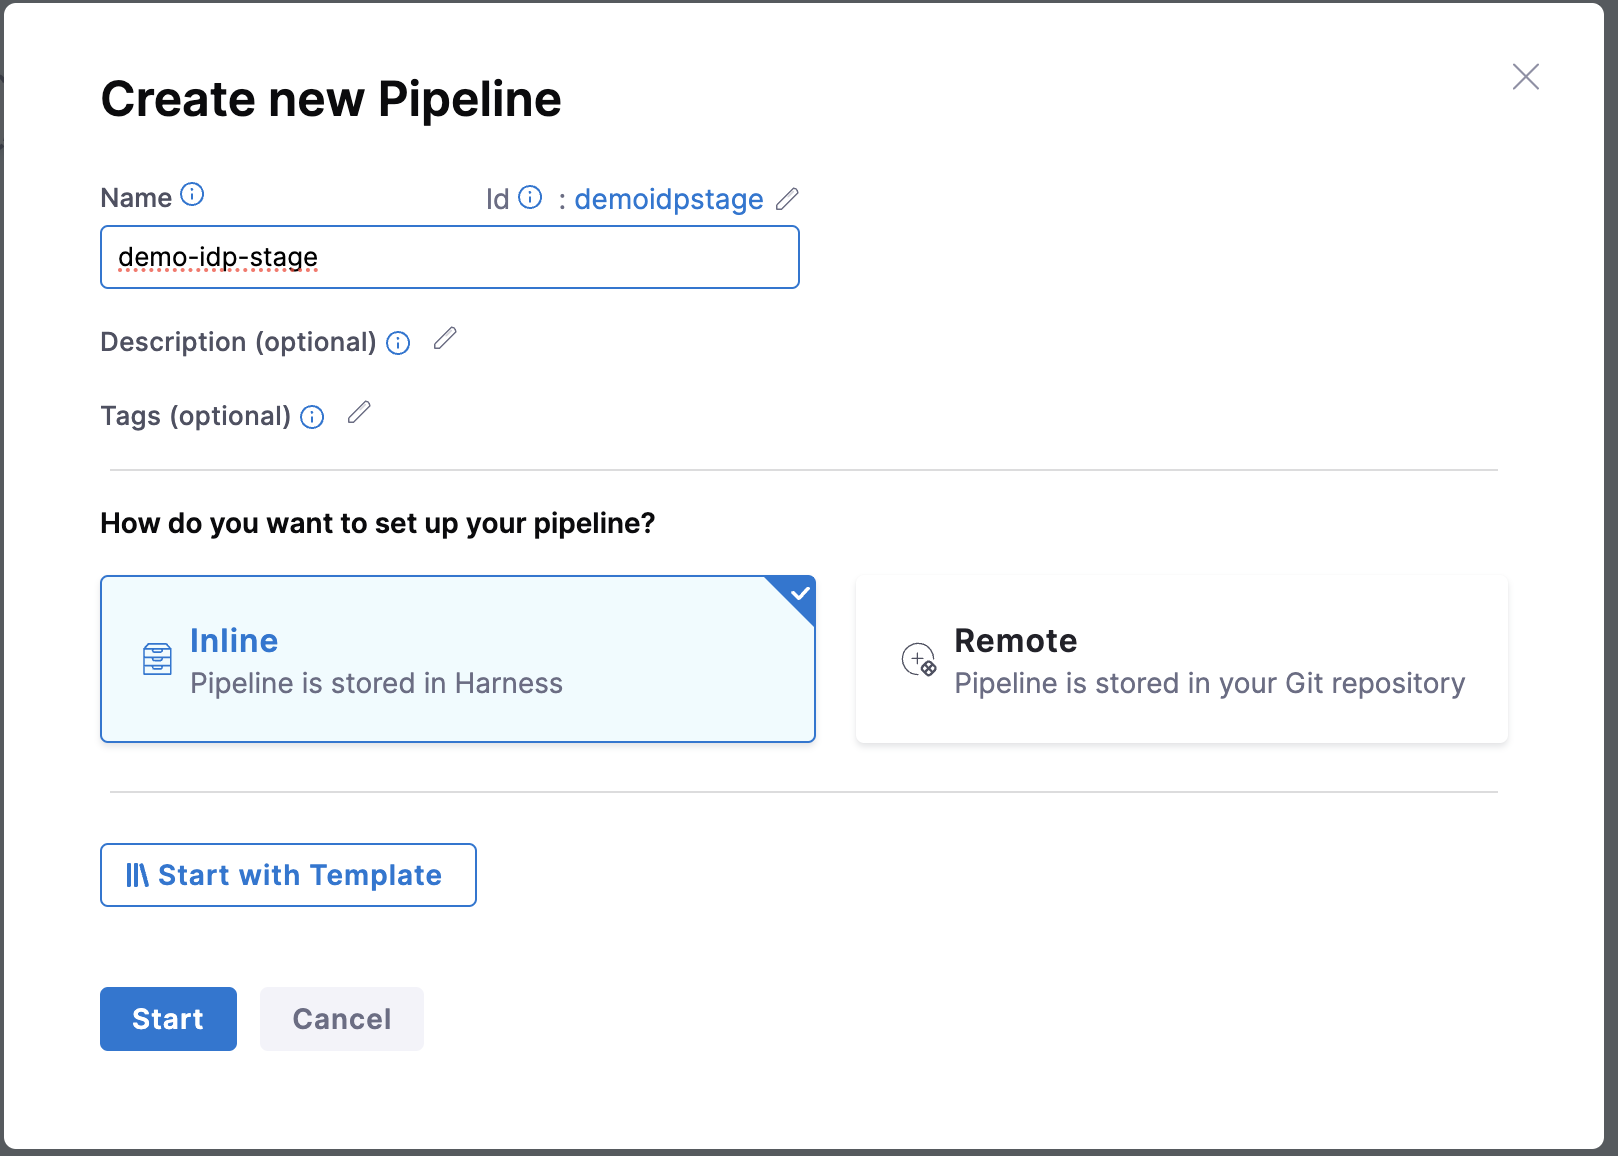
- Add a Name for your Pipeline and select Inline as pipeline storage options.
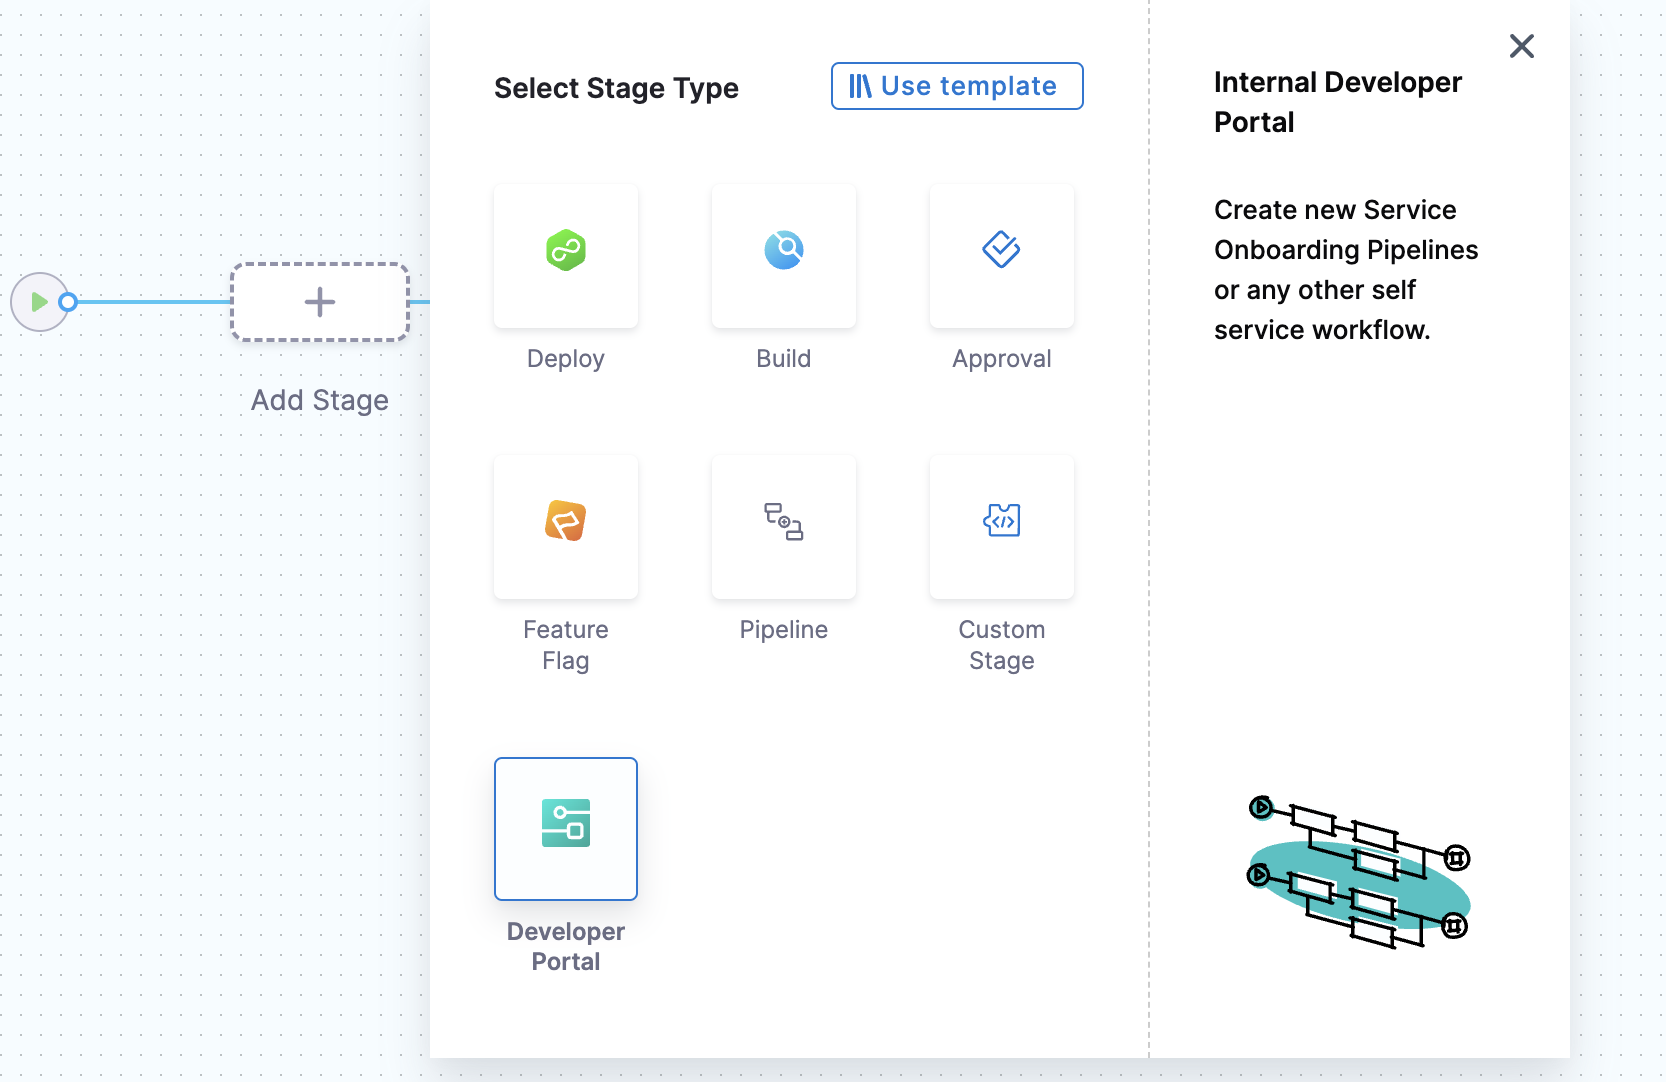
- Now Select Stage Type as Developer Portal and add a name for your stage to Set Up Stage.

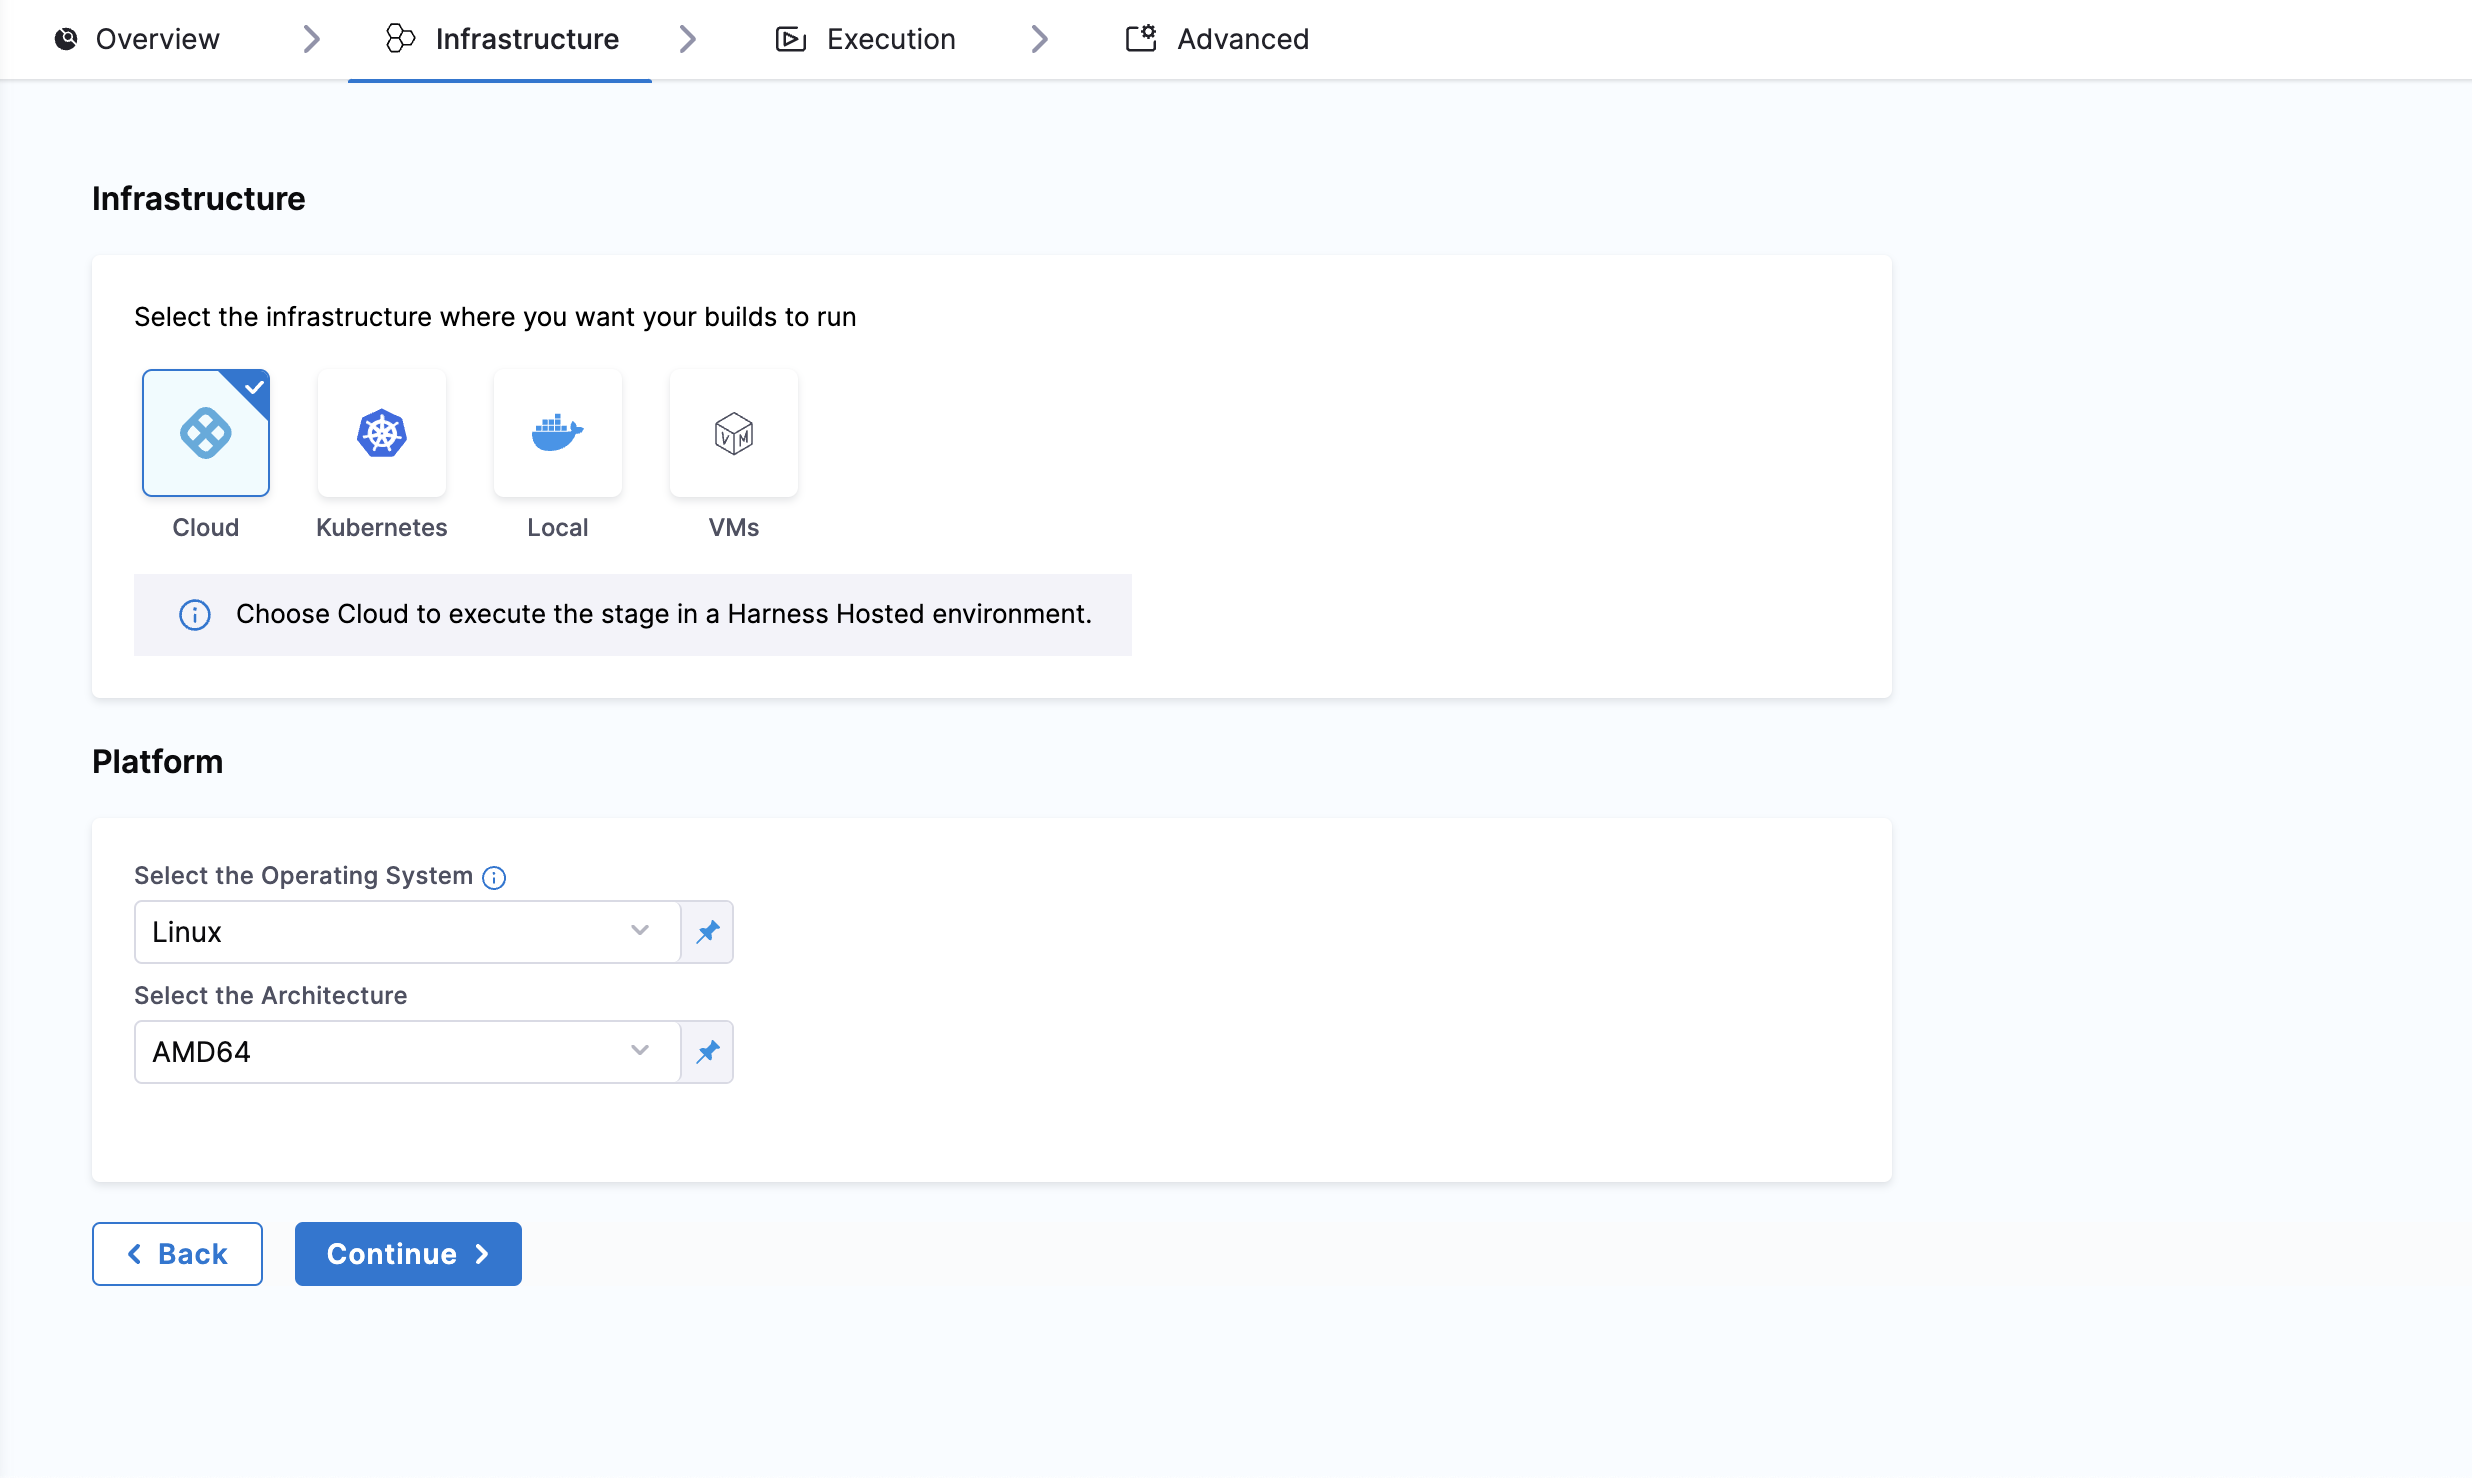
Infrastructure
- Under Infrastructure tab, Harness recommends Harness Cloud, but you can also use a Kubernetes cluster, local runner or self-hosted VM build infrastructure.
Pipeline Variables
-
Before adding the execution steps we need to create some pipeline variables with runtime inputs which we will be using as expression inputs in various steps under execution.
-
To add pipeline variables go to the right nav of your pag and select Variables icon.
-
Under Custom Variables select +Add Variable.
-
Add a name to the variable and select the input type as Runtime.
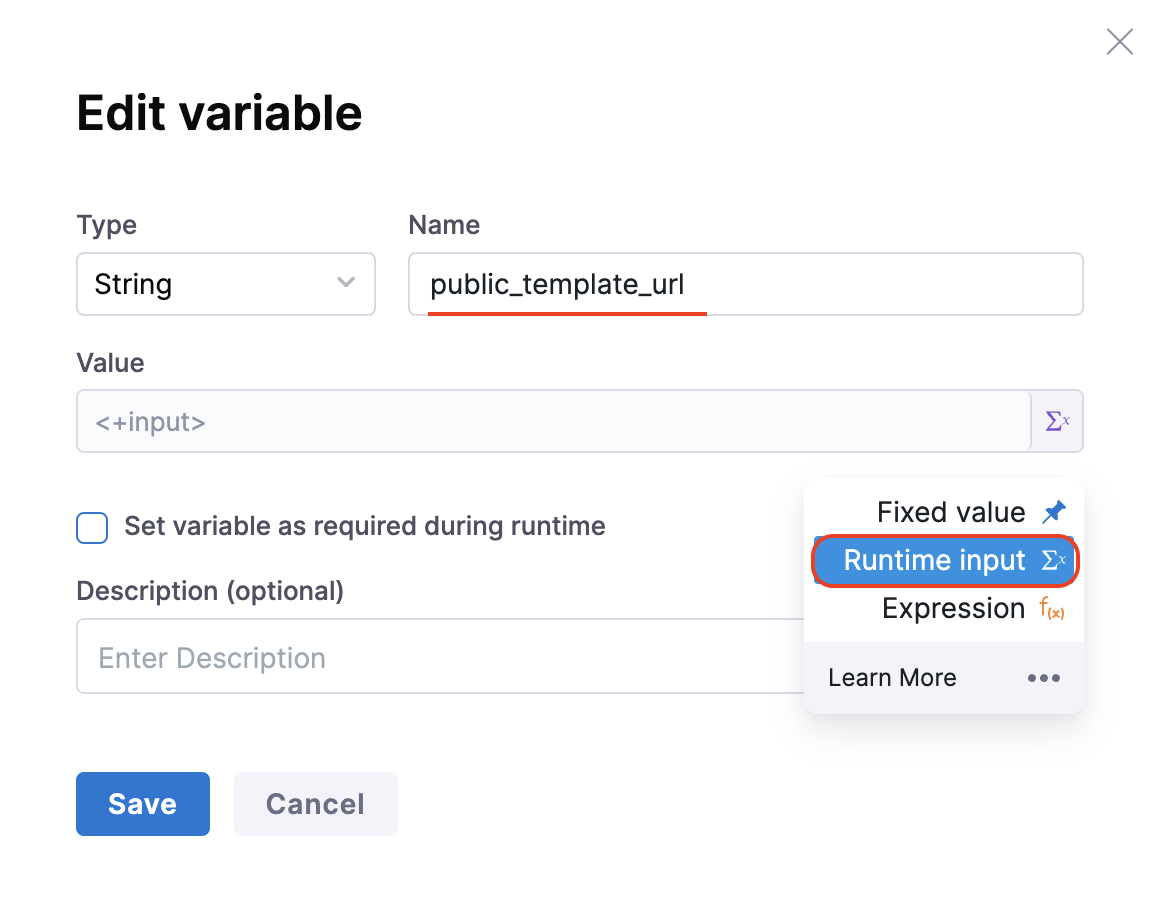
To use the pipeline variable select the input type as Expressions and follow the JEXL format to add the variable.
Execution Steps
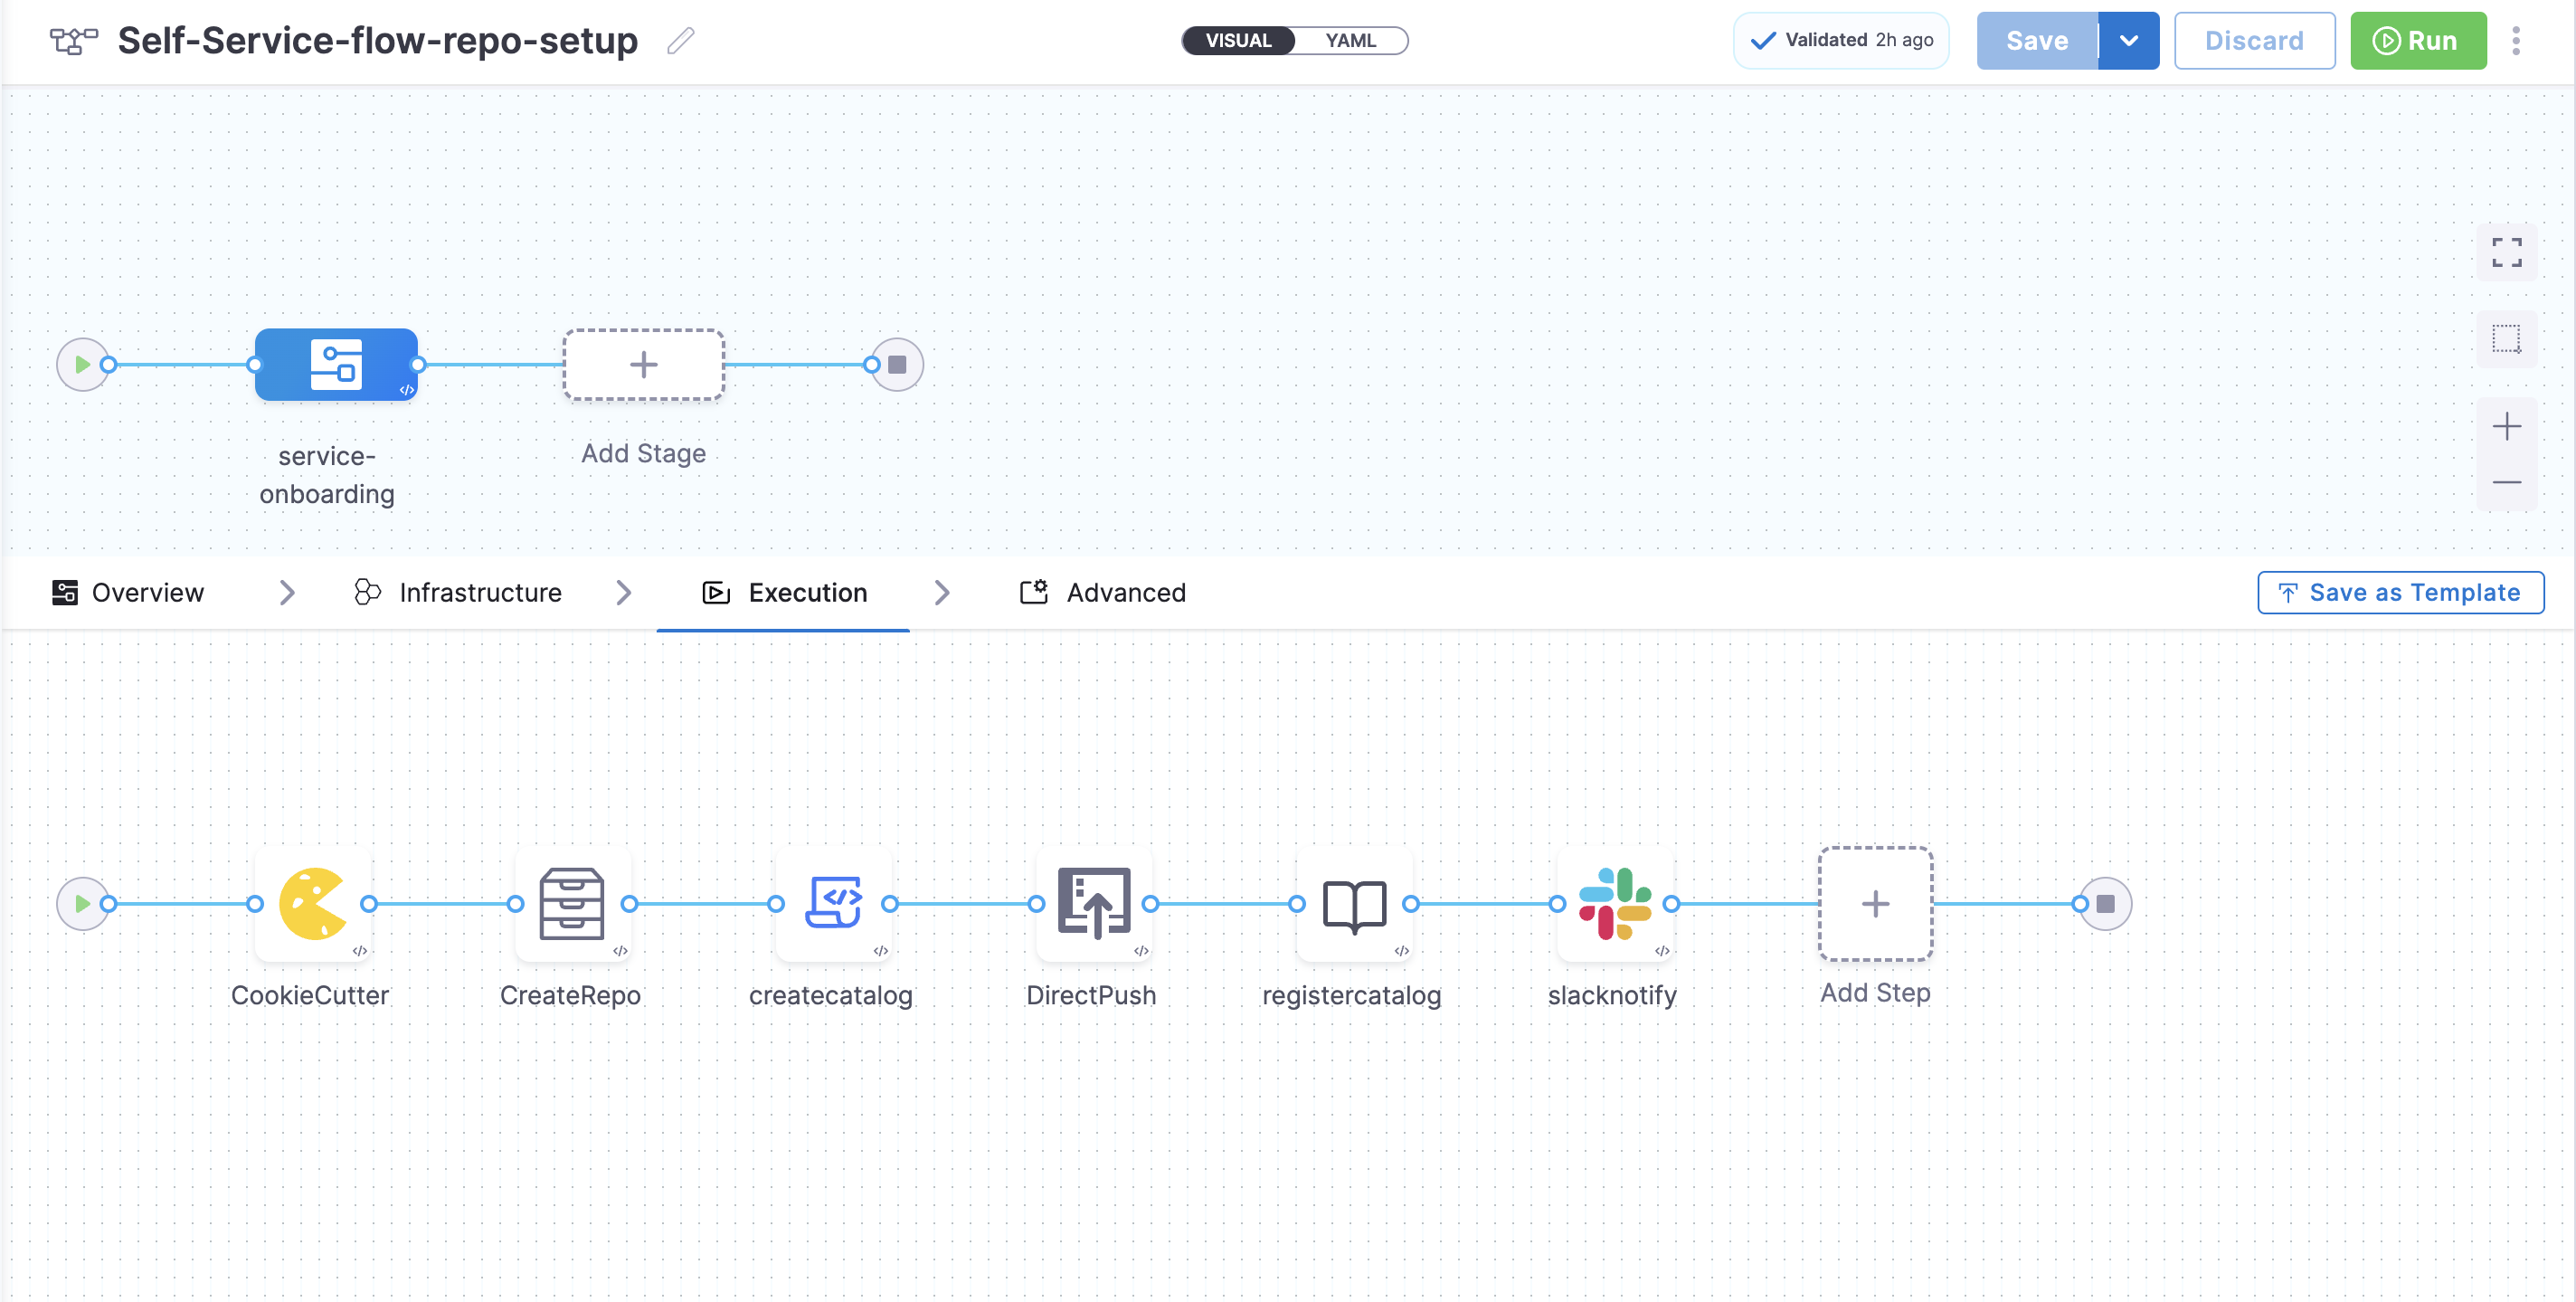
- Now add the steps under the Execution Tab. The following is the list of suggested steps to be used in the execution.
1. Add the Git Clone step (Ignore this step if your repository containing cookiecutter template is public)
Add a Git Clone step to clone a repository into the Developer Portal stage's workspace.
By cloning the repository, you gain access to the necessary code, scripts, or configurations, enabling you to perform various actions.
The Git Clone step uses a containerized step group. For more information, go to Containerize step groups.
- YAML
- Pipeline Studio
- step:
   type: GitClone
   name: GitClone_1
   identifier: GitClone_1
   spec:
     connectorRef: account.GitConnectorBzGN8G1COj
     repoName: myrepo
     build:
       type: branch
       spec:
         branch: main
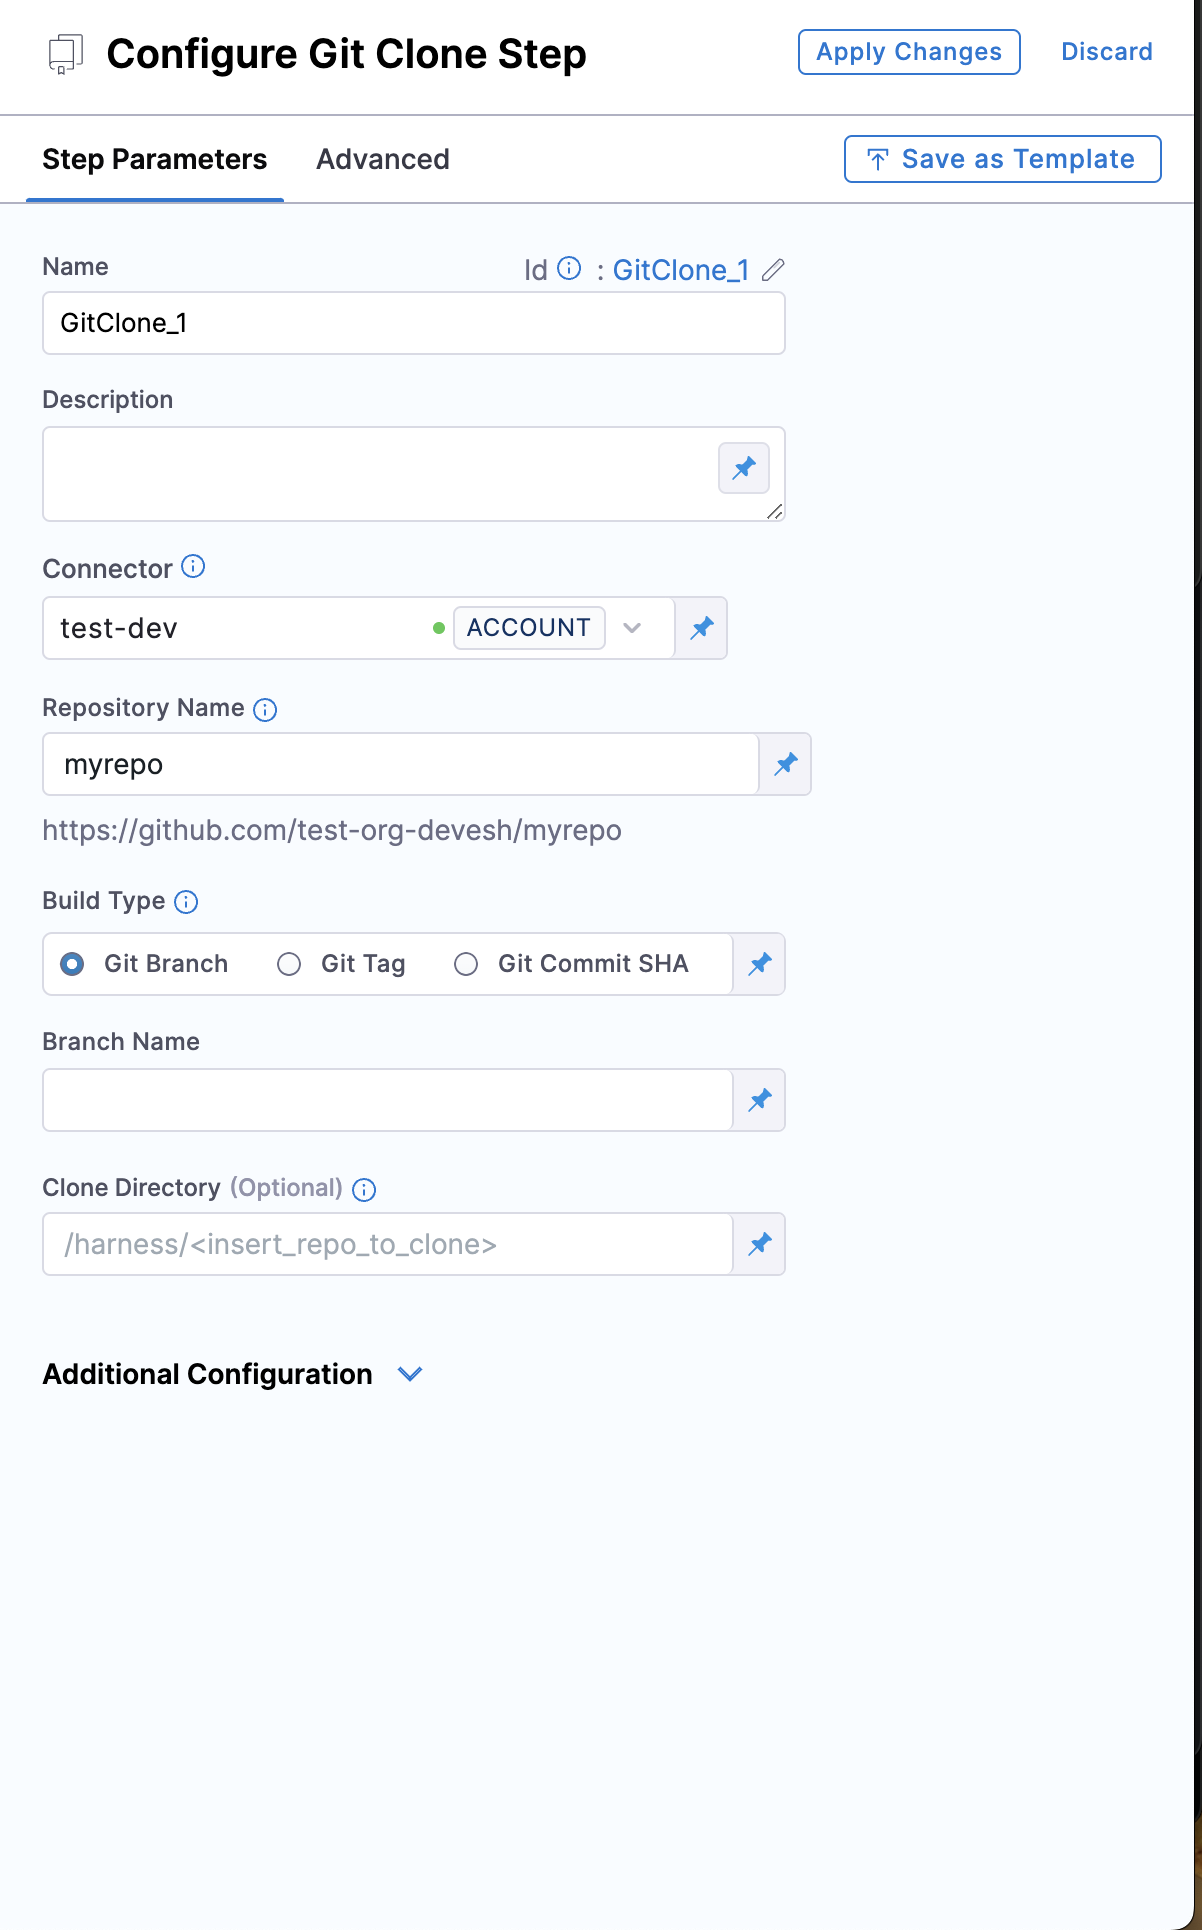
- In your Developer Portal stage, in Execution, select Add Step.
- Select Git Clone.
- Configure the steps using the settings described below.
Select Git Provider
Select the Git Provider as Third-party Git Provider in case you don't have your code in Harness Code Repository
Connector
Presently for Connectors the connection type ssh is not supported and for credentials only Username and Password type is supported.
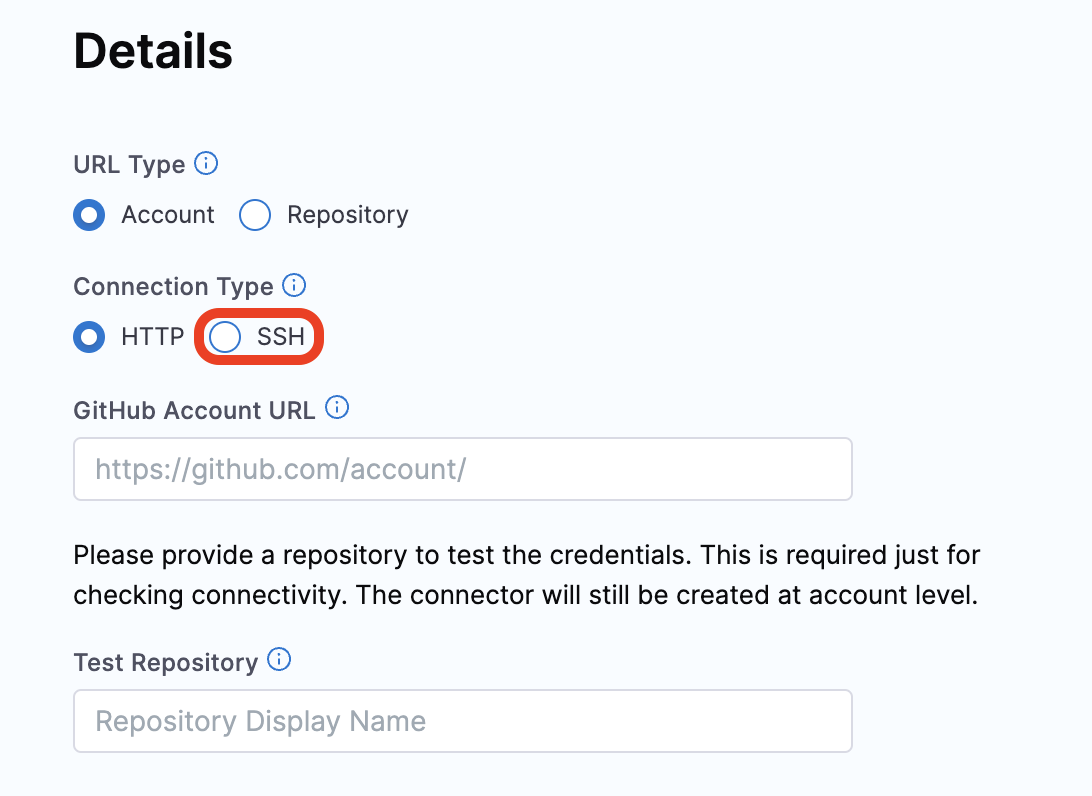
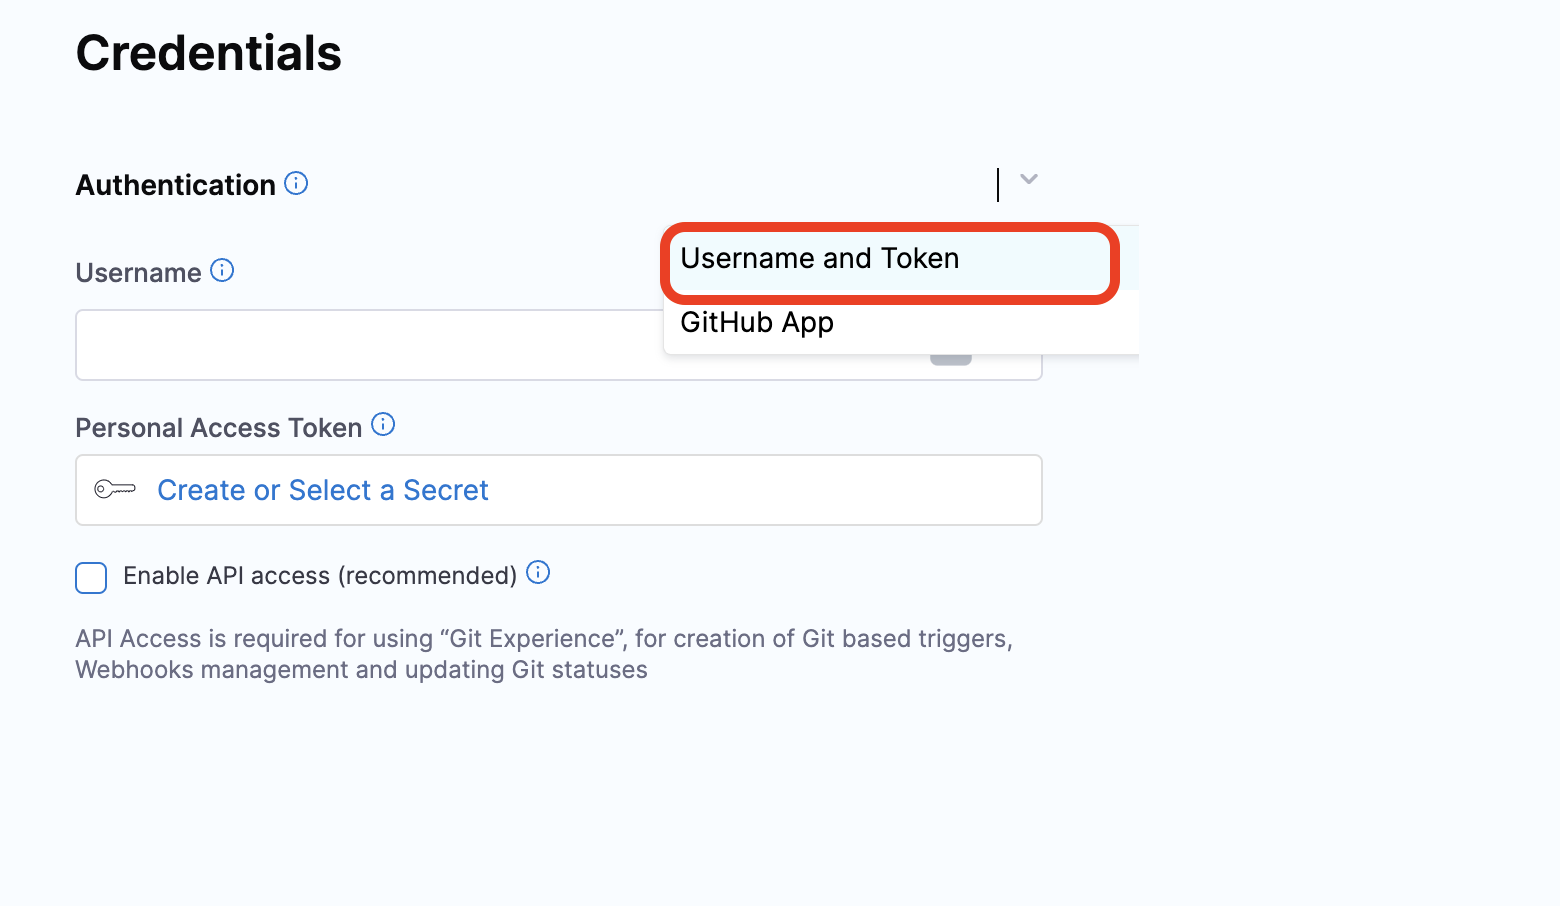
Select a connector for the source control provider hosting the code repository that you want the step to clone.
The following topics provide more information about creating code repo connectors:
- Azure Repos: Connect to Azure Repos
- Bitbucket: Bitbucket connector settings reference
- GitHub: GitHub connector settings reference
- GitLab: GitLab Connector Settings reference
- Other Git providers:
Repository Name
If the connector's URL Type is Repository, then Repository Name is automatically populated based on the repository defined in the connector's configuration.
If the connector's URL Type is Account, then you must specify the name of the code repository that you want to clone into the stage workspace.
Build Type, Branch Name, and Tag Name
For Build Type, select Git Branch if you want the step to clone code from a specific branch within the repository, or select Git Tag if you want the step to clone code from a specific commit tag. Based on your selection, specify a Branch Name or Tag Name.
You can use fixed values, runtime input, or variable expressions for the branch and tag names. For example, you can enter <+input> for the branch or tag name to supply a branch or tag name at runtime.
Clone directory
An optional target path in the stage workspace where you want to clone the repo.
Depth
The number of commits to fetch when the step clones the repo.
The default depth is 0, which fetches all commits from the relevant branch.
For more information, go to the git clone documentation.
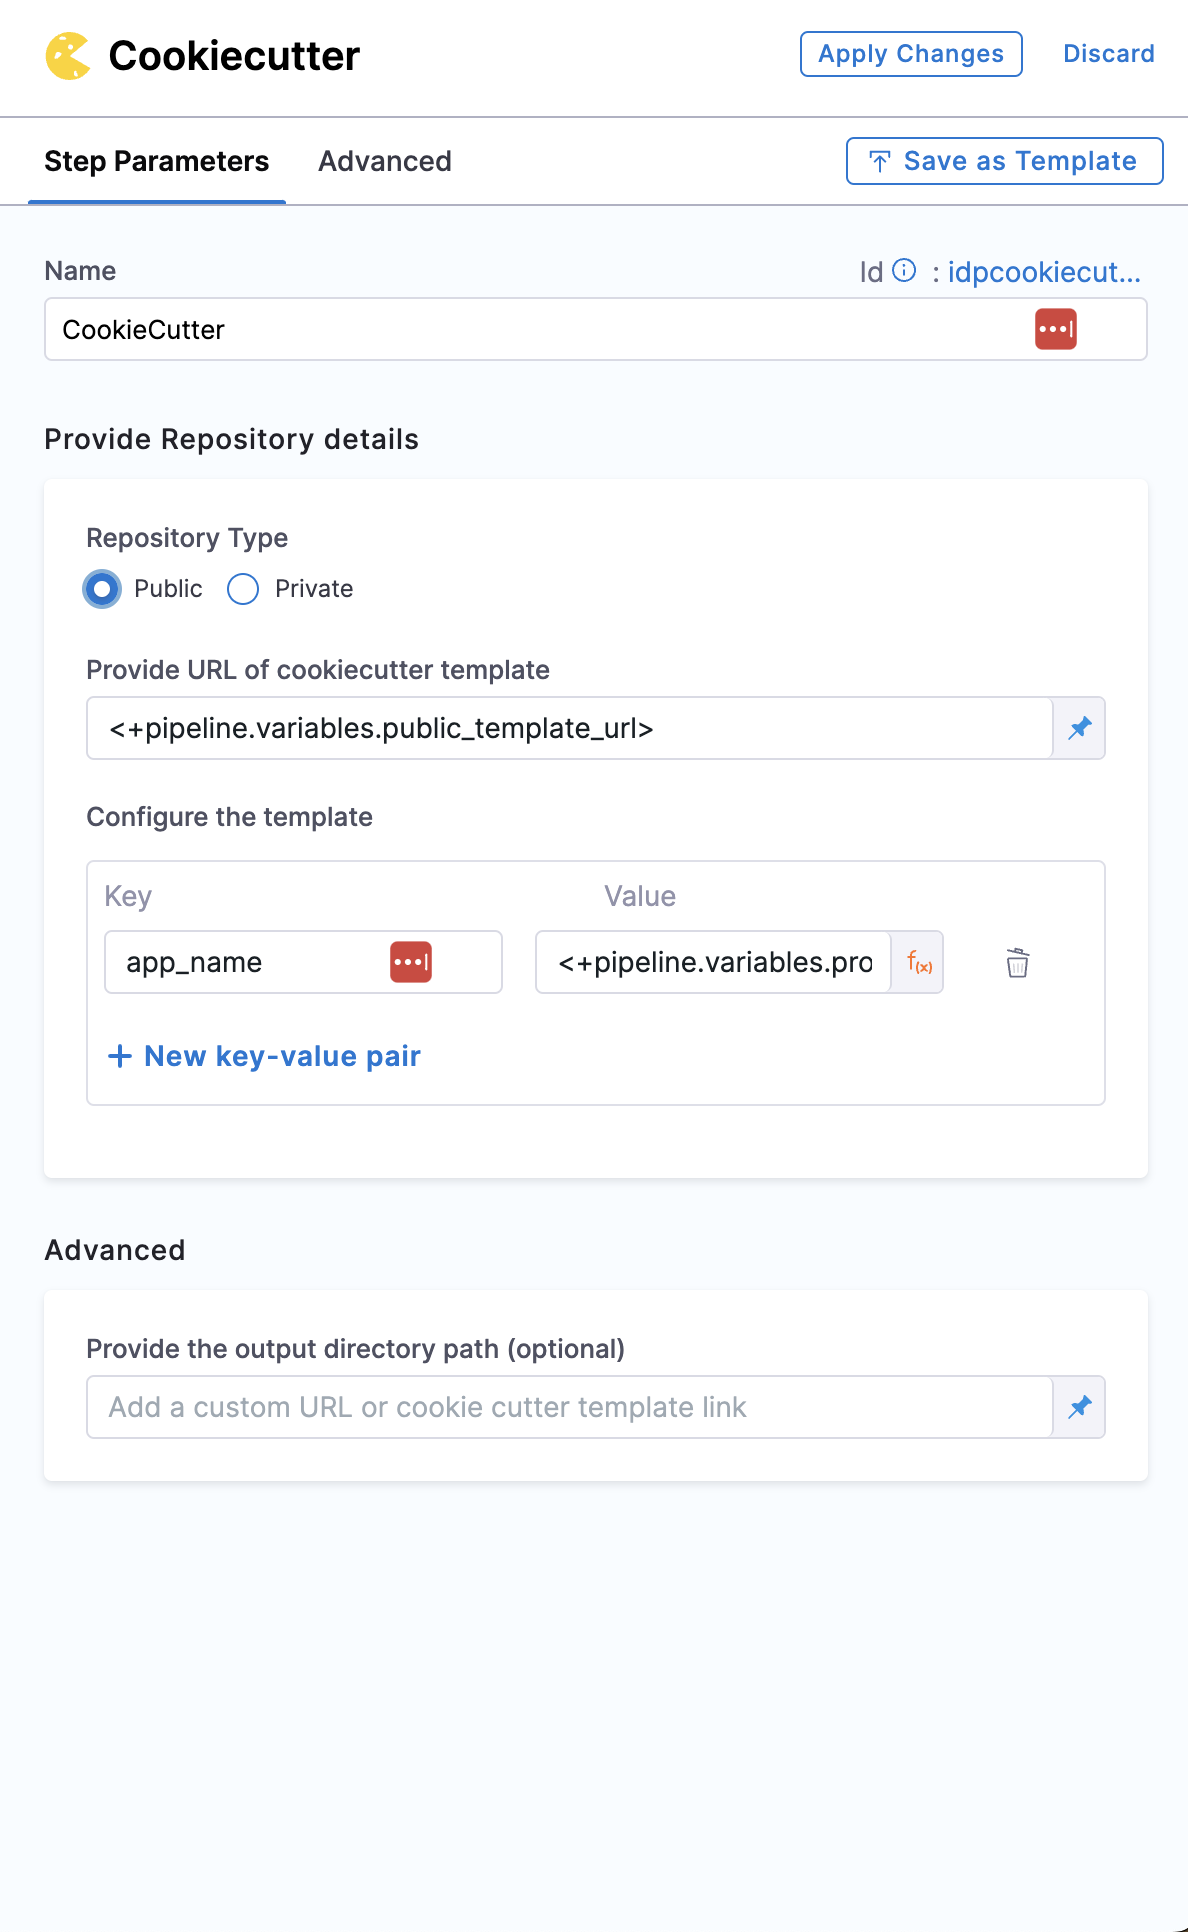
2. Cookiecutter
Cookiecutter step is used to take inputs for the cookiecutter template.
- YAML
- Pipeline Studio
- step:
    type: CookieCutter
    name: CookieCutter
    identifier: idpcookiecutter
    spec:
    templateType: public
    publicTemplateUrl: <+pipeline.variables.public_template_url>
    cookieCutterVariables:
        app_name: <+pipeline.variables.project_name>
Repository Type
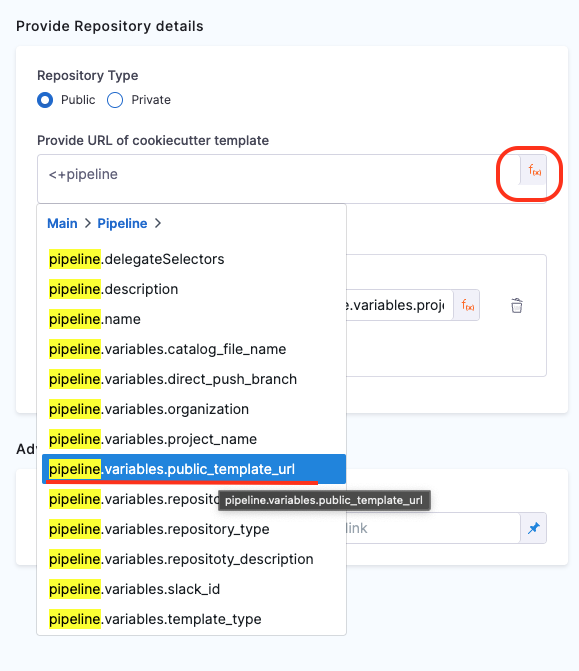
Select the repository type in which your template is stored, which could be public or private git repository.
In case it's Private make sure you have added the gitclone step and the path for template should be the Clone Directory added in gitclone step
In case of public templates you just need to add the public URL of the template path stored in your git provider. eg https://github.com/devesh-harness/test-cookicutter
Path for Template
First select the type of the input it could be a Fixed Value, Runtime input or Expression
In case of Fixed Value provide the absolute value of template URL, for eg. https://github.com/devesh-harness/test-cookicutter
In case of Runtime Input provide the absolute value of the template URL after you run the pipeline.
In case of Expression provide the pipeline variable in JEXL format which takes the template URL as an input, this is widely used while implementing the self service flow.
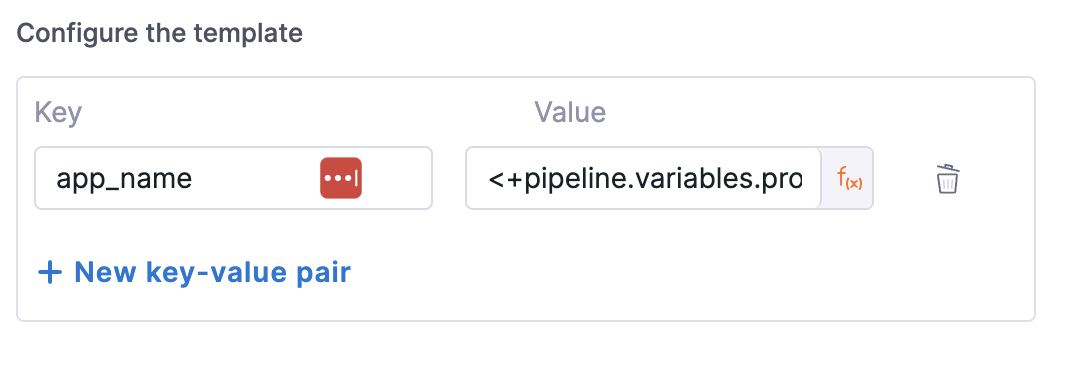
Configure Template
Provide the input required the template in terms of key value pairs in this step.
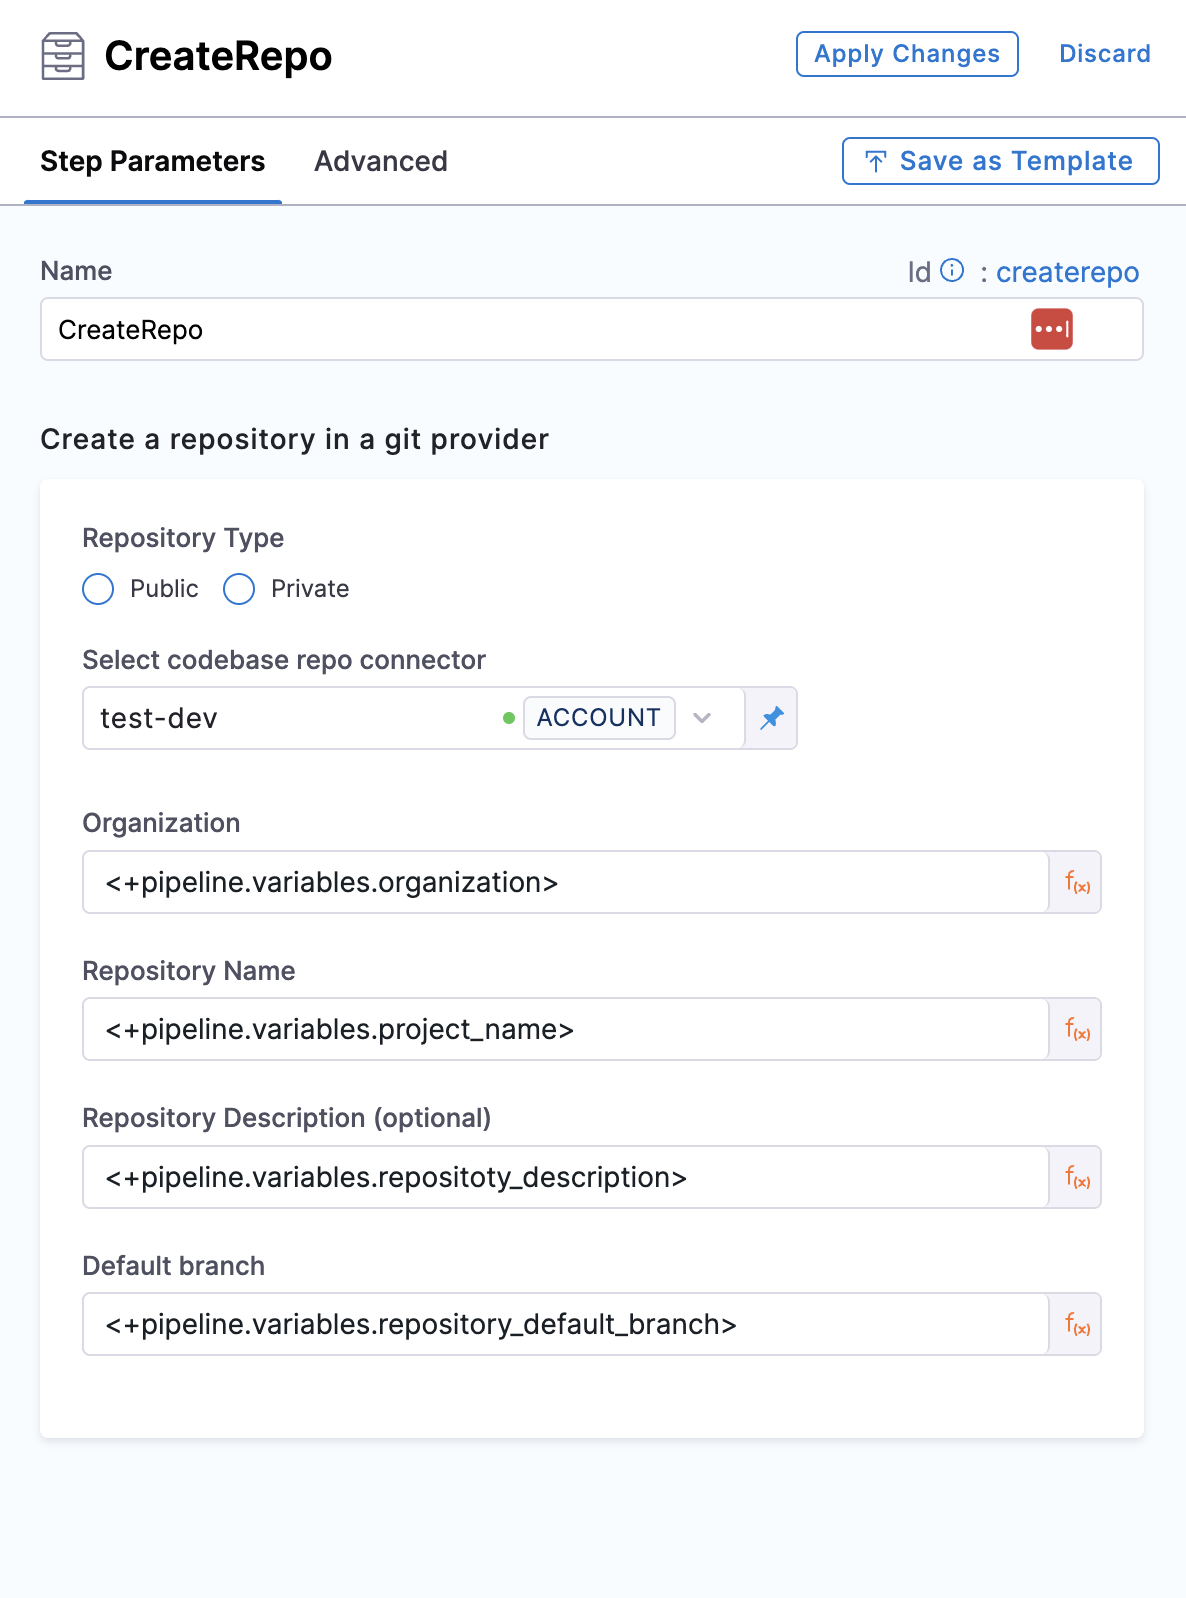
3. Create Repo
This step is to create the repository in your git provider which will be later used to add the service/app created using cookiecutter step along with the catalog which will be created in the Create Catalog step.
- YAML
- Pipeline Studio
- step:
    type: CreateRepo
    name: CreateRepo
    identifier: createrepo
    spec:
    connectorRef: account.testdev
    organization: <+pipeline.variables.organization>
    repository: <+pipeline.variables.project_name>
    repoType: <+pipeline.variables.repository_type>
    description: <+pipeline.variables.repository_description>
    defaultBranch: <+pipeline.variables.repository_default_branch>
Repository Type
Select the repository type you want to create, which could be public or private.
Connector
Presently for Connectors the connection type ssh is not supported and for credentials only Username and Password type is supported.
Select a connector for the git provider that will host the code repository.
The following topics provide more information about creating code repo connectors:
- Azure Repos: Connect to Azure Repos
- Bitbucket: Bitbucket connector settings reference
- GitHub: GitHub connector settings reference
- GitLab: GitLab Connector Settings reference
- Other Git providers:
Org, Repo, Description, Default Branch
Add the org, repo name, Repo Description and Default branch for the repo you want to create.
Output
Following is the output variable of this step.
- repositoryUrl : The URL of the repository created eg;
https://github.com/org-name/repo-nameand this variable could be used in other steps in the pipeline by using this JEXL expression as a stage variable<+pipeline.stages.idp.spec.execution.steps.createrepo.output.outputVariables.repositoryUrl>
These output variable could be viewed under the output tab in

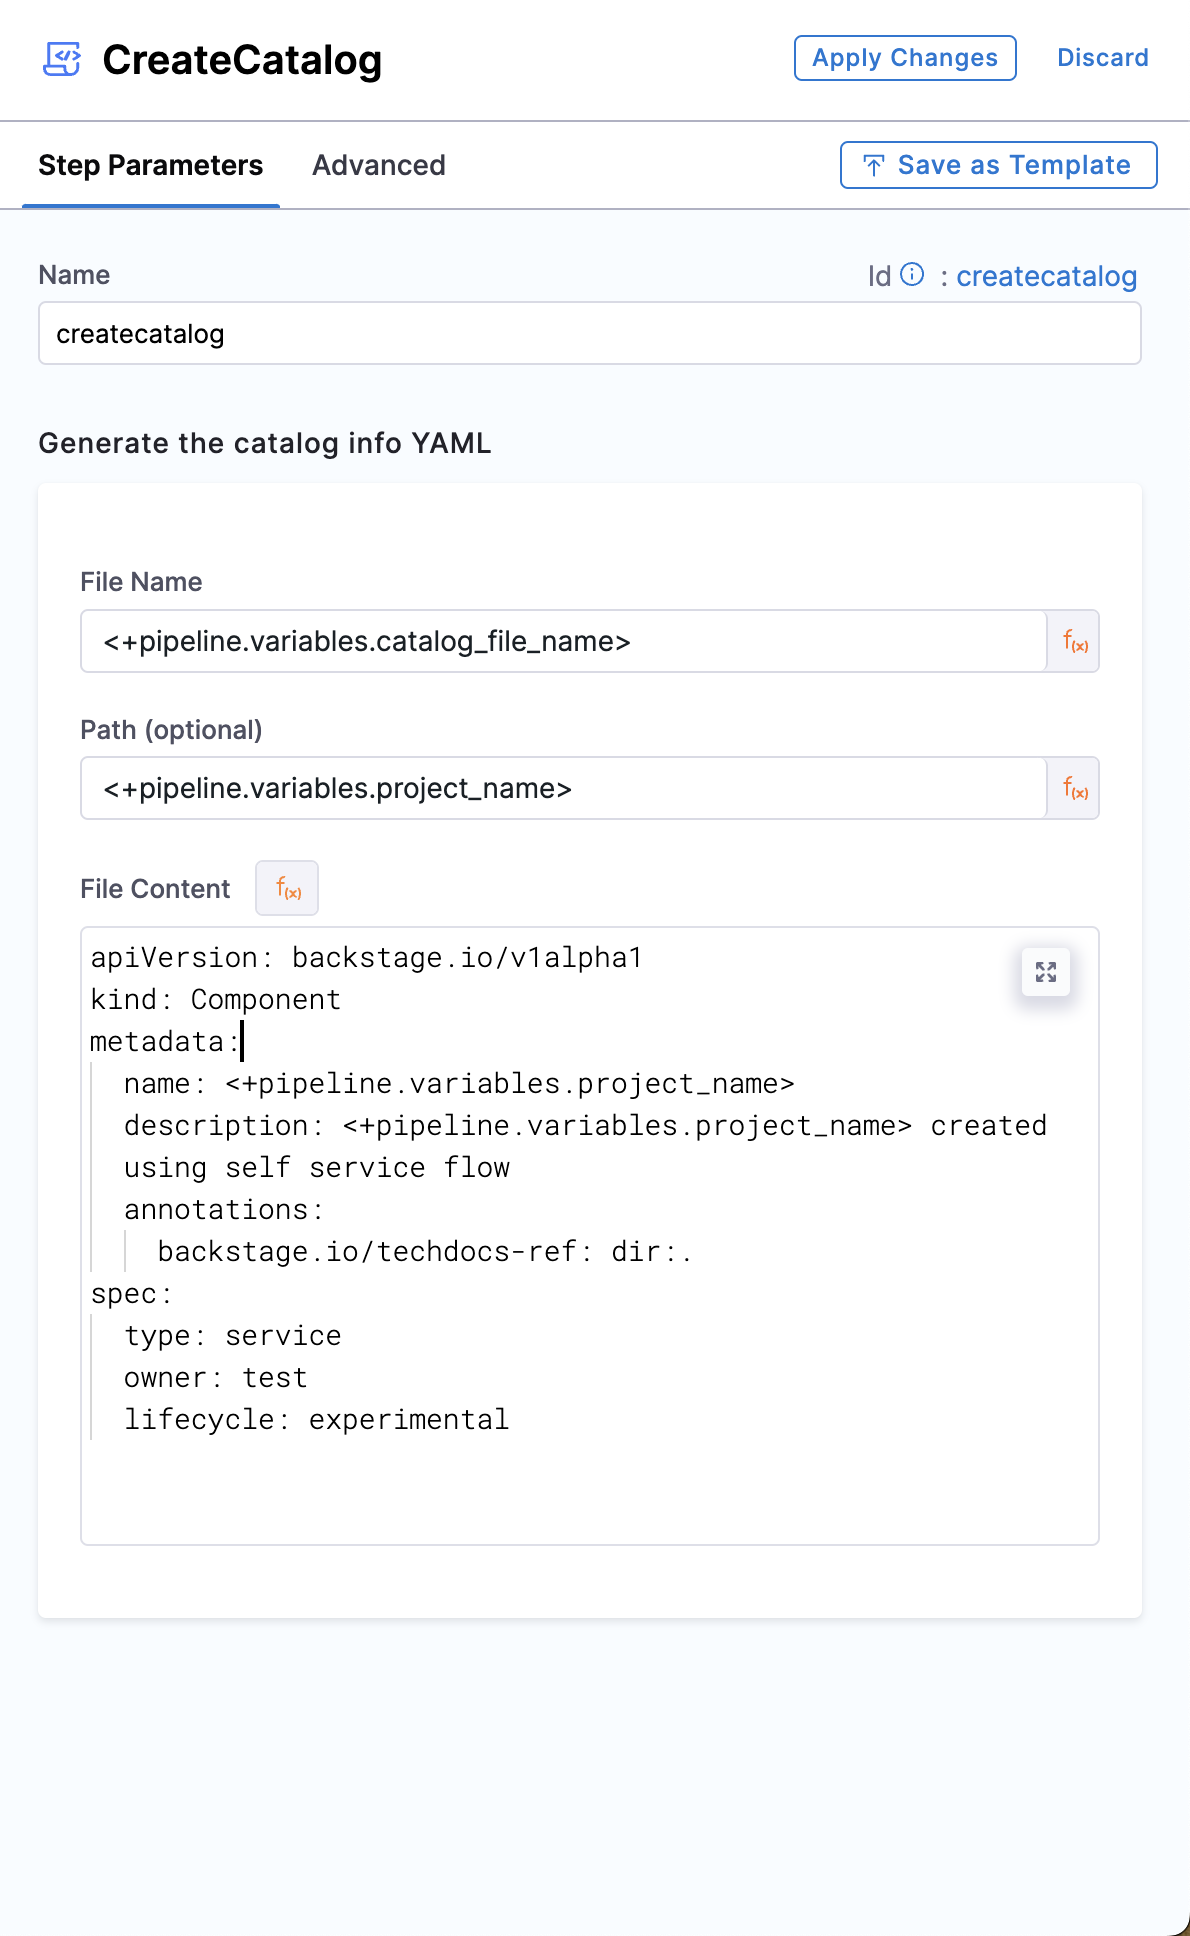
4. Create Catalog
This step is used to create the catalog-info.yaml/idp.yaml to be ued to register the software componenet we have created in previous step in our IDP catalog.
- YAML
- Pipeline Studio
- step:
    type: CreateCatalog
    name: createcatalog
    identifier: createcatalog
    spec:
    fileName: <+pipeline.variables.catalog_file_name>
    filePath: <+pipeline.variables.project_name>
    fileContent: |-
        apiVersion: backstage.io/v1alpha1
        kind: Component
        metadata:
        name: <+pipeline.variables.project_name>
        description: <+pipeline.variables.project_name> created using self service flow
        annotations:
            backstage.io/techdocs-ref: dir:.
        spec:
        type: service
        owner: test
        lifecycle: experimental
File Name, Path
Name the catalog-info.yaml followed by providing a path if you don't want to register in the root of the repo created in the Create Repo step.
File Content
Add the YAML content to be added in your catalog-info.yaml file, For eg.,
apiVersion: backstage.io/v1alpha1
kind: Component
metadata:
  name: <+pipeline.variables.project_name>
  description: <+pipeline.variables.project_name> created using self service flow
  annotations:
    backstage.io/techdocs-ref: dir:.
spec:
  type: service
  owner: test
  lifecycle: experimental
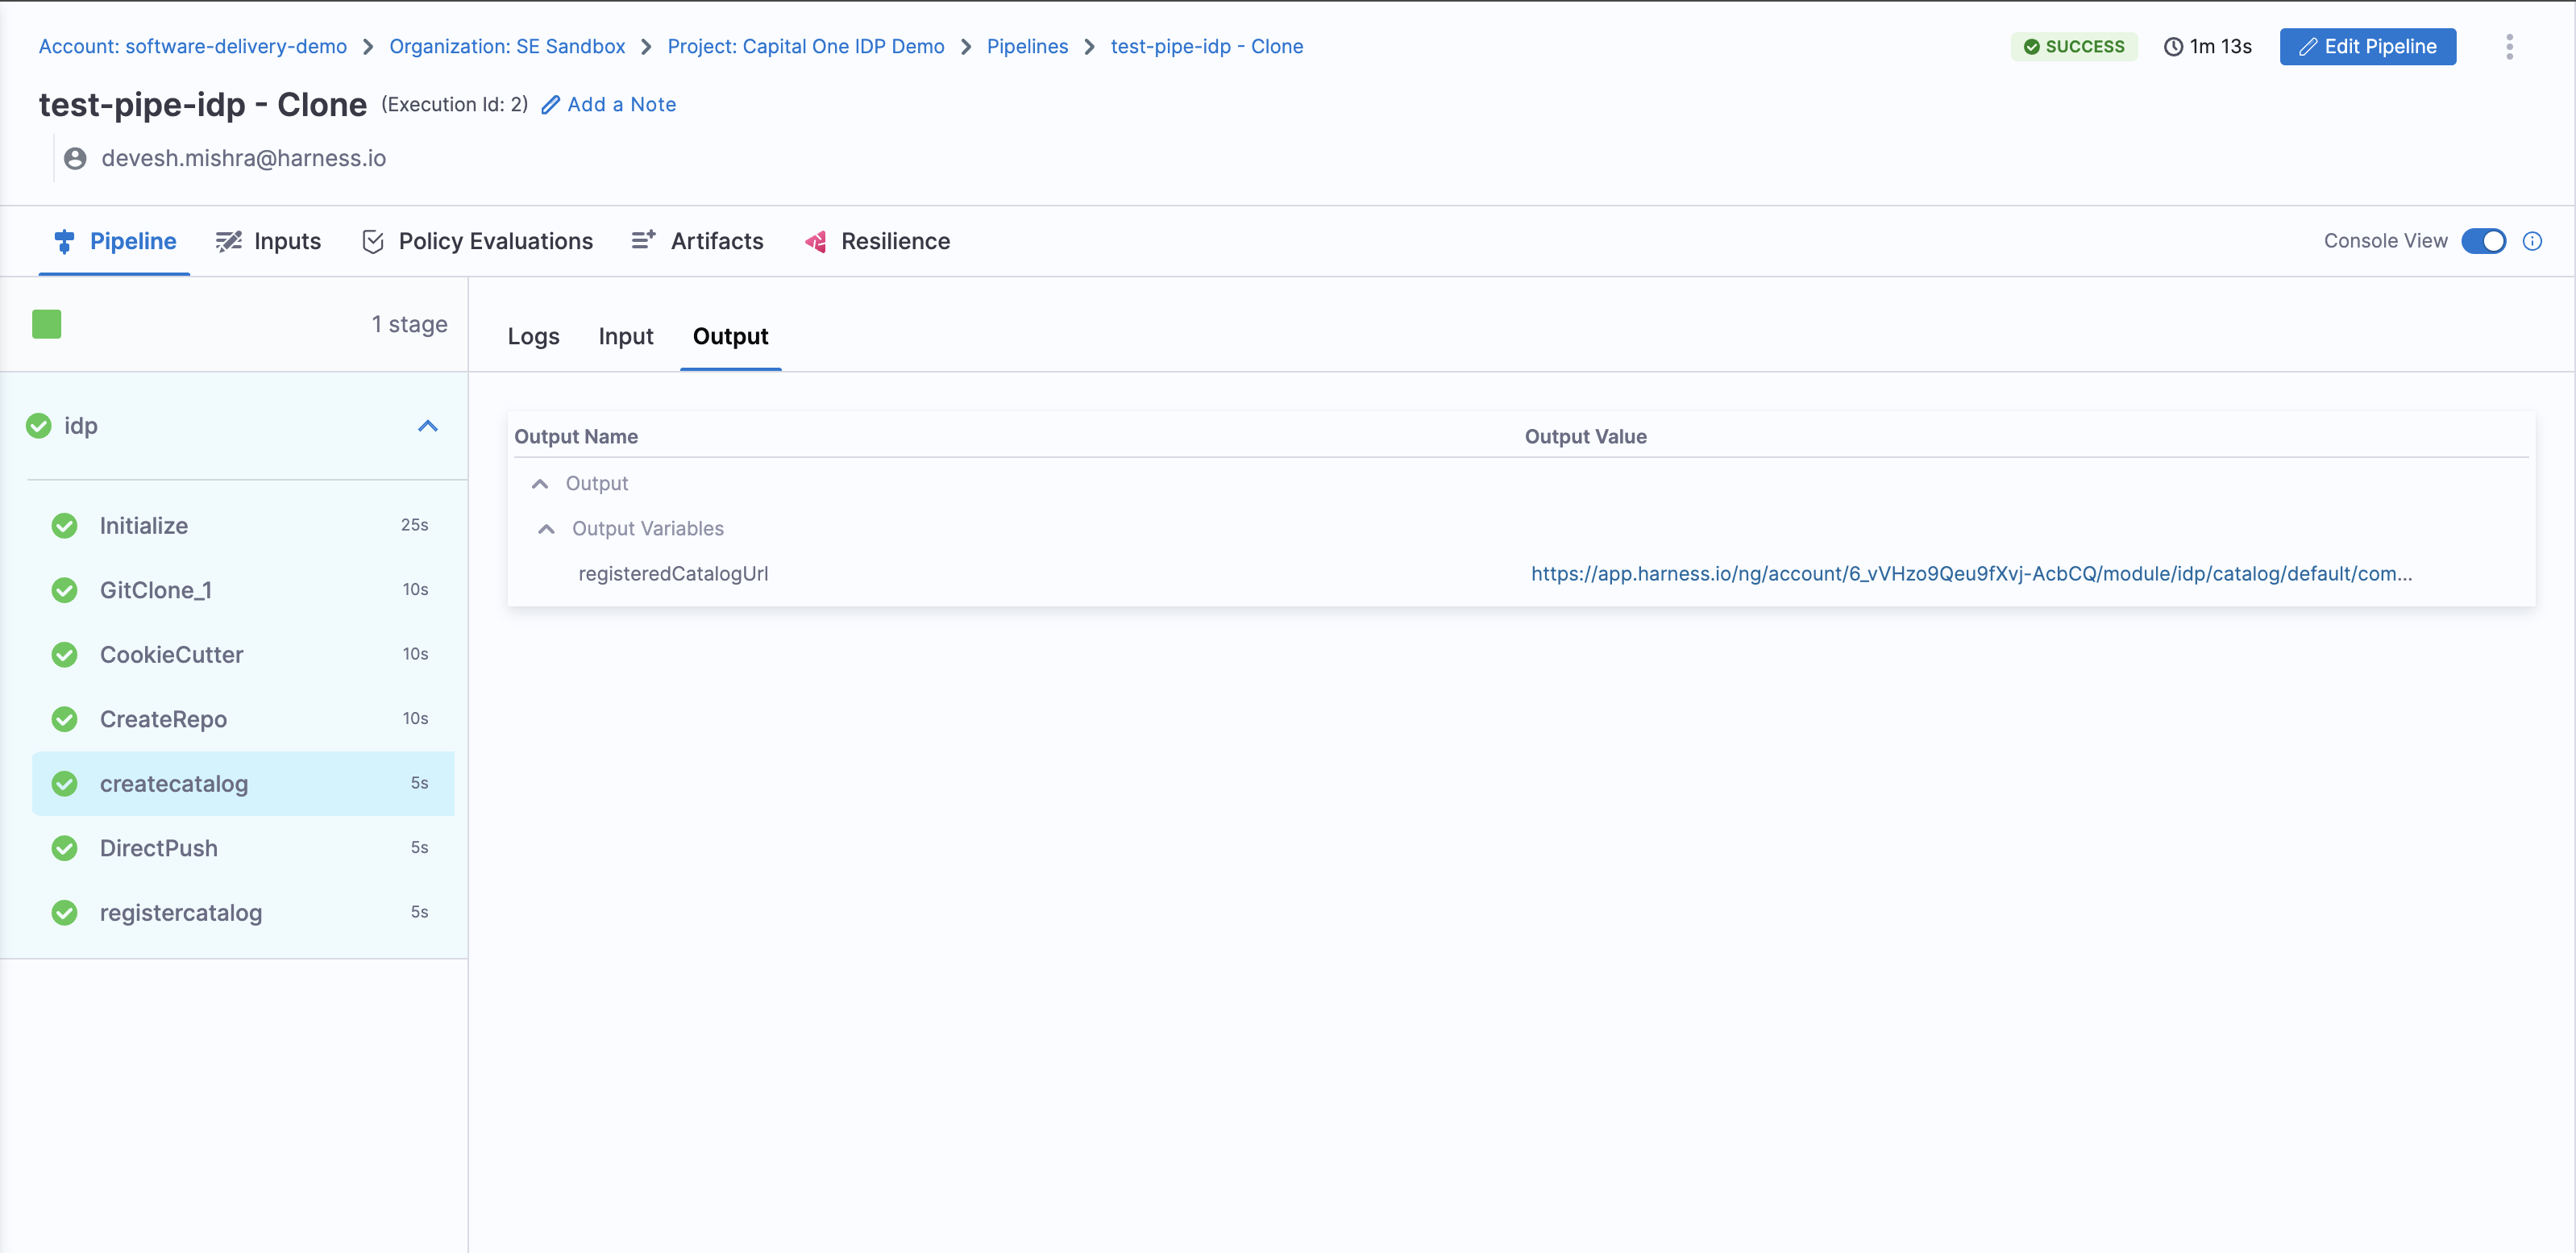
Output
Following is the output variable of this step.
- registeredCatalogUrl : The URL of the software component registered in the catalog of IDP eg;
https://app.harness.io/ng/account/**************/module/idp/catalog/default/component/component-nameand this variable could be used in other steps in the pipeline by using this JEXL expression as a stage variable<<+pipeline.stages.idp.spec.execution.steps.createcatalog.output.outputVariables.registeredCatalogUrl>>
These output variable could be viewed under the output tab in
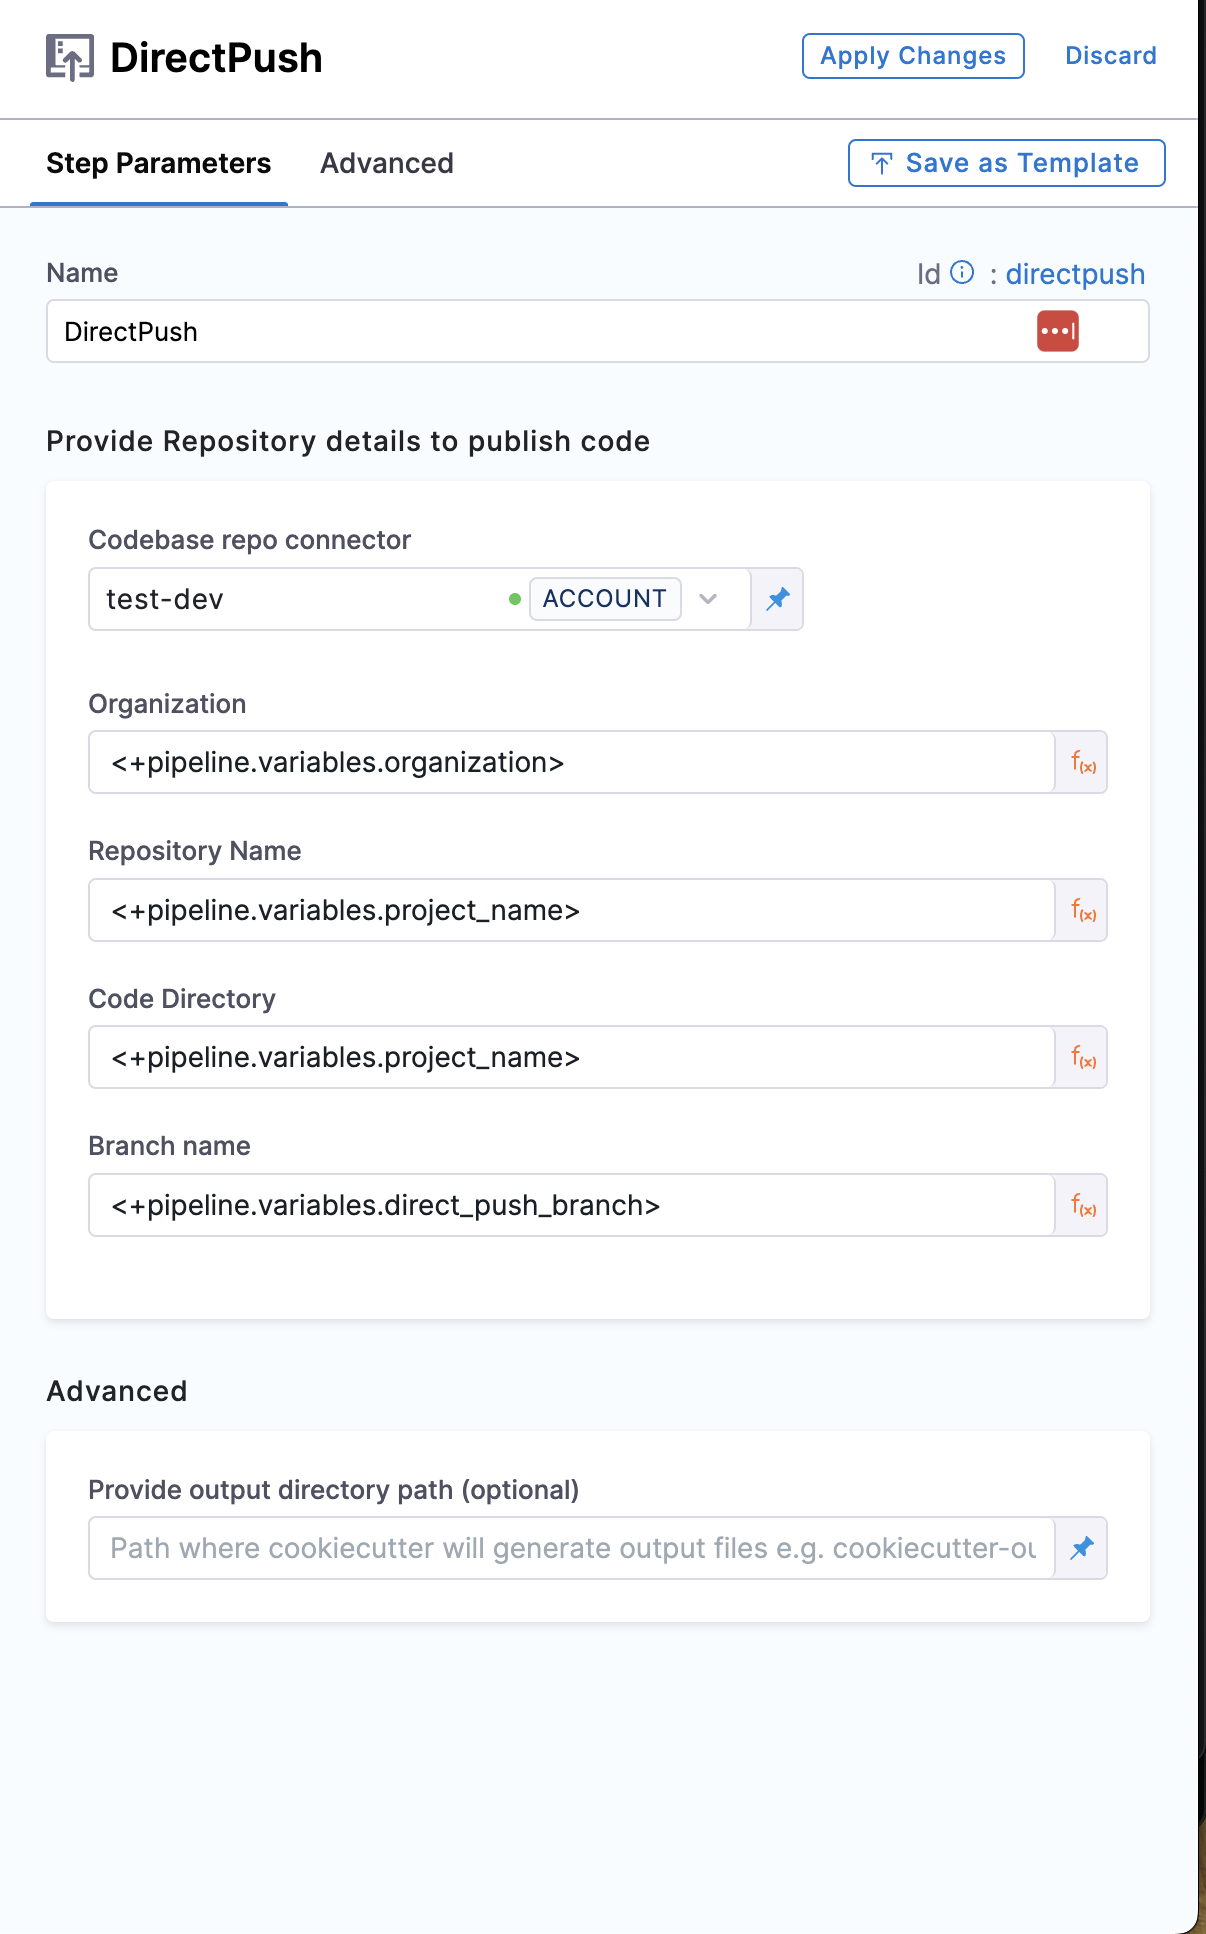
5. Direct Push
This step is used to push the service/application created using Cookiecutter step along with the catalog-info.yaml in the repo you created in previous step.
- YAML
- Pipeline Studio
- step:
    type: DirectPush
    name: DirectPush
    identifier: directpush
    spec:
    connectorRef: account.testdev
    repository: <+pipeline.variables.project_name>
    organization: <+pipeline.variables.organization>
    codeDirectory: <+pipeline.variables.project_name>
    branch: <+pipeline.variables.direct_push_branch>
Connector
Presently for Connectors the connection type ssh is not supported and for credentials only Username and Password type is supported.
Select a connector for the git provider where you want to push the code.
The following topics provide more information about creating code repo connectors:
- Azure Repos: Connect to Azure Repos
- Bitbucket: Bitbucket connector settings reference
- GitHub: GitHub connector settings reference
- GitLab: GitLab Connector Settings reference
- Other Git providers:
Org, Repo, Code Directory, Branch
Add the Org, Repo Name, Repo Description and Branch Name where you want to push the code.
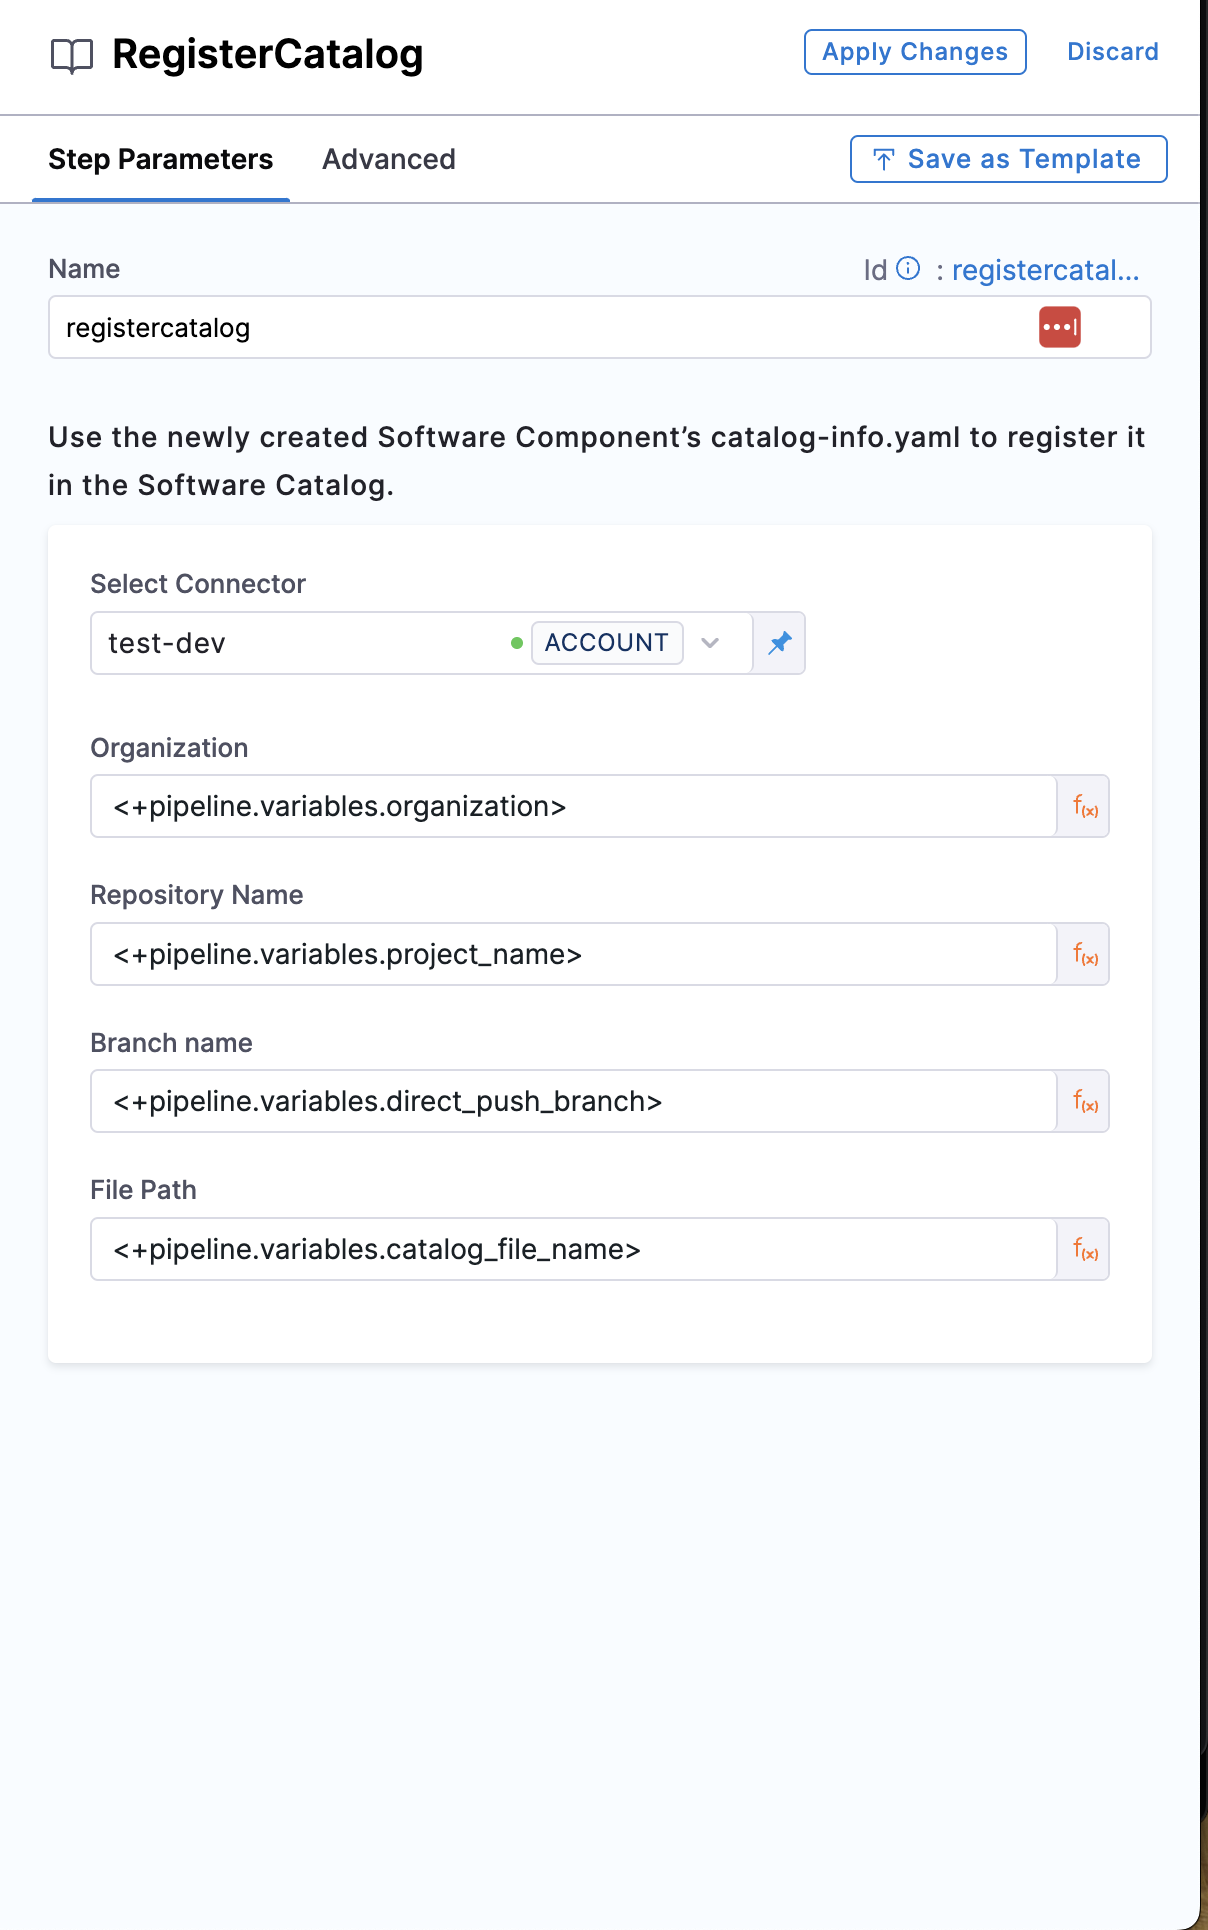
6. Register Catalog
This step is used to register the software component created in the Catalog of Harness IDP using catalog-info.yaml.
- YAML
- Pipeline Studio
- step:
    type: RegisterCatalog
    name: registercatalog
    identifier: registercatalog
    spec:
    connectorRef: account.testdev
    repository: <+pipeline.variables.project_name>
    organization: <+pipeline.variables.organization>
    filePath: <+pipeline.variables.catalog_file_name>
    branch: <+pipeline.variables.direct_push_branch>
Connector
Presently for Connectors the connection type ssh is not supported and for credentials only Username and Password type is supported.
Select a connector for the git provider where your catalog-info.yaml is stored.
The following topics provide more information about creating code repo connectors:
- Azure Repos: Connect to Azure Repos
- Bitbucket: Bitbucket connector settings reference
- GitHub: GitHub connector settings reference
- GitLab: GitLab Connector Settings reference
- Other Git providers:
Org, Repo, Branch, File Path
Add the Org, Repo Name, Branch and the File path relative to the root of the repository, where your catalog-info.yaml is present.
Following is the output variable of this step.
- catalogInfoUrl : The URL of the
catalog-info.yamlstored in your git provider where you created the repo in the CreateRepo step eg;https://github.com/org-name/repo-name/blob/code/catalog-info.yamland this variable could be used in other steps in the pipeline by using this JEXL expression as a stage variable<<+pipeline.stages.idp.spec.execution.steps.registercatalog.output.outputVariables.catalogInfoUrl>>
These output variable could be viewed under the output tab in
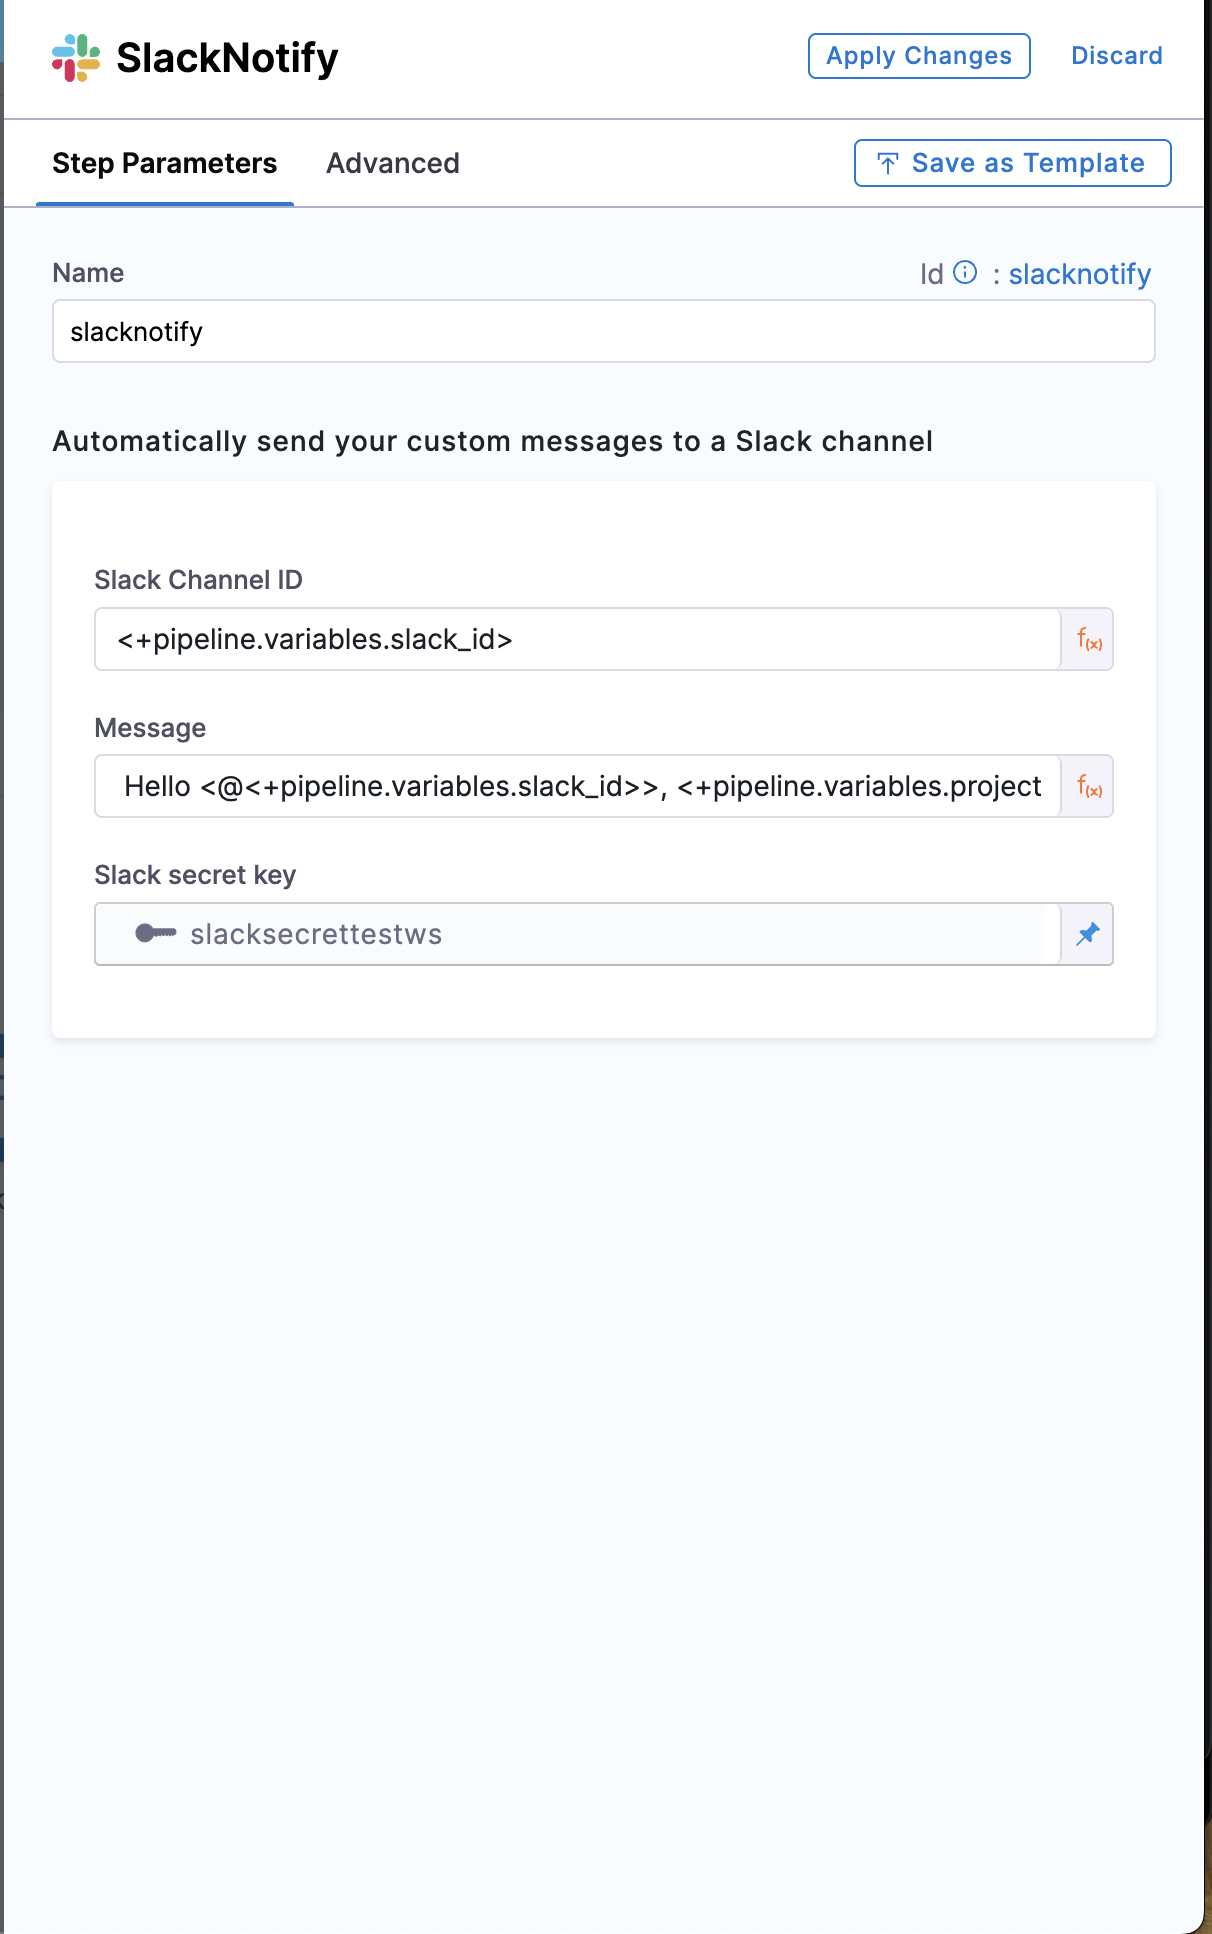
7. Slack Notify
This step is used to notify in your team's clack channel or individual developers once the pipeline is executed successfully and your Software component is registered successfully in your Software Catalog.
- YAML
- Pipeline Studio
- step:
    type: SlackNotify
    name: slacknotify
    identifier: slacknotify
    spec:
    slackId: <+pipeline.variables.slack_id>
    messageContent: " Hello <@<+pipeline.variables.slack_id>>, <+pipeline.variables.project_name> project is created using flows in Harness IDP,\\n*Created Catalog Yaml -* <<+pipeline.stages.serviceonboarding.spec.execution.steps.registercatalog.output.outputVariables.catalogInfoUrl>|Link>\\n*Created Repository -* <<+pipeline.stages.serviceonboarding.spec.execution.steps.createrepo.output.outputVariables.repositoryUrl>|Link>\\n*Registered Catalog -* <<+pipeline.stages.serviceonboarding.spec.execution.steps.createcatalog.output.outputVariables.registeredCatalogUrl>|Link>"
    token: slacksecrettestws
The output of the steps like Create Repo, Register Catalog in the JEXL format has been used to construct the messageContent for slack notification.
The token is the Bot-tokens
- Add the Name of the Step
The output of the steps like Create Repo, Register Catalog in the JEXL format has been used to construct the Message for slack notification.
Slack Channel ID
- Slack Web App
- MacOS/Windows App
- Open any web browser and log in to your Slack account.
- Now, go to your workspace main page and view the URL in the search bar at the top.
- The URL looks ends with a C and letters. This part of the path represents your Slack Channel ID.
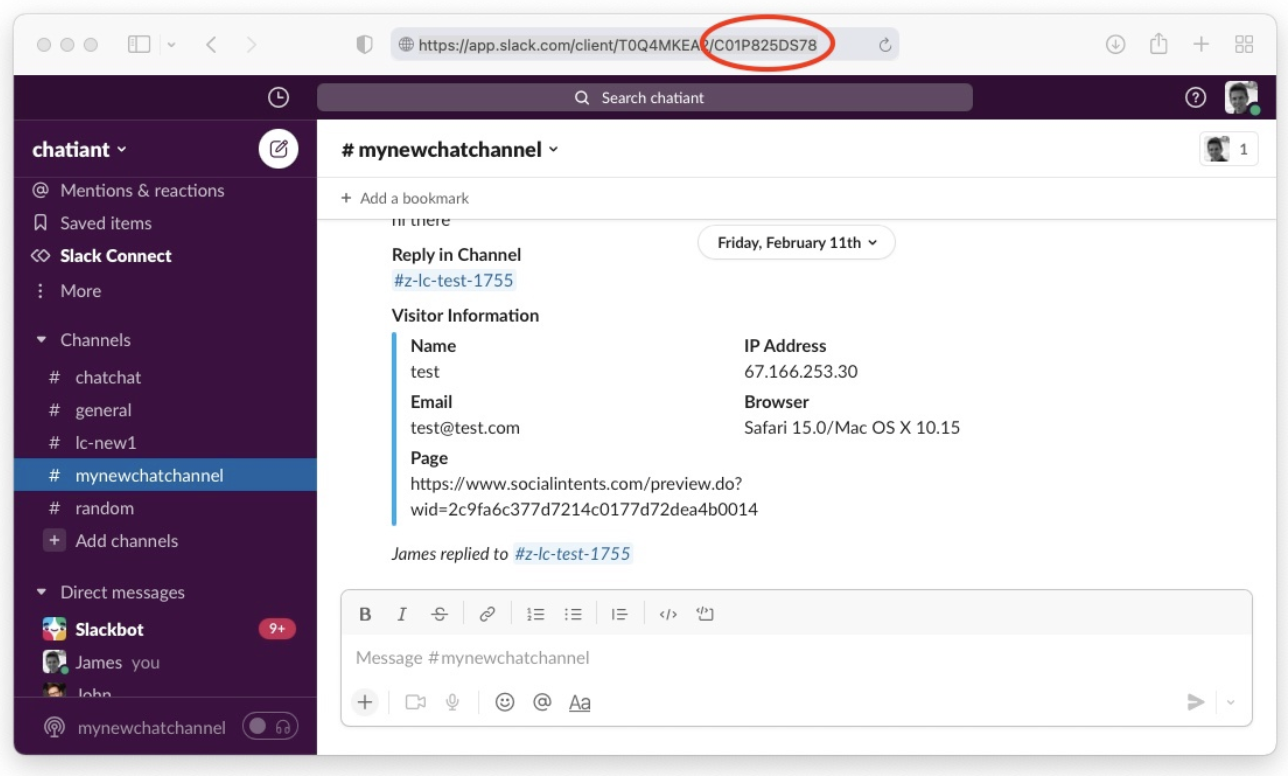
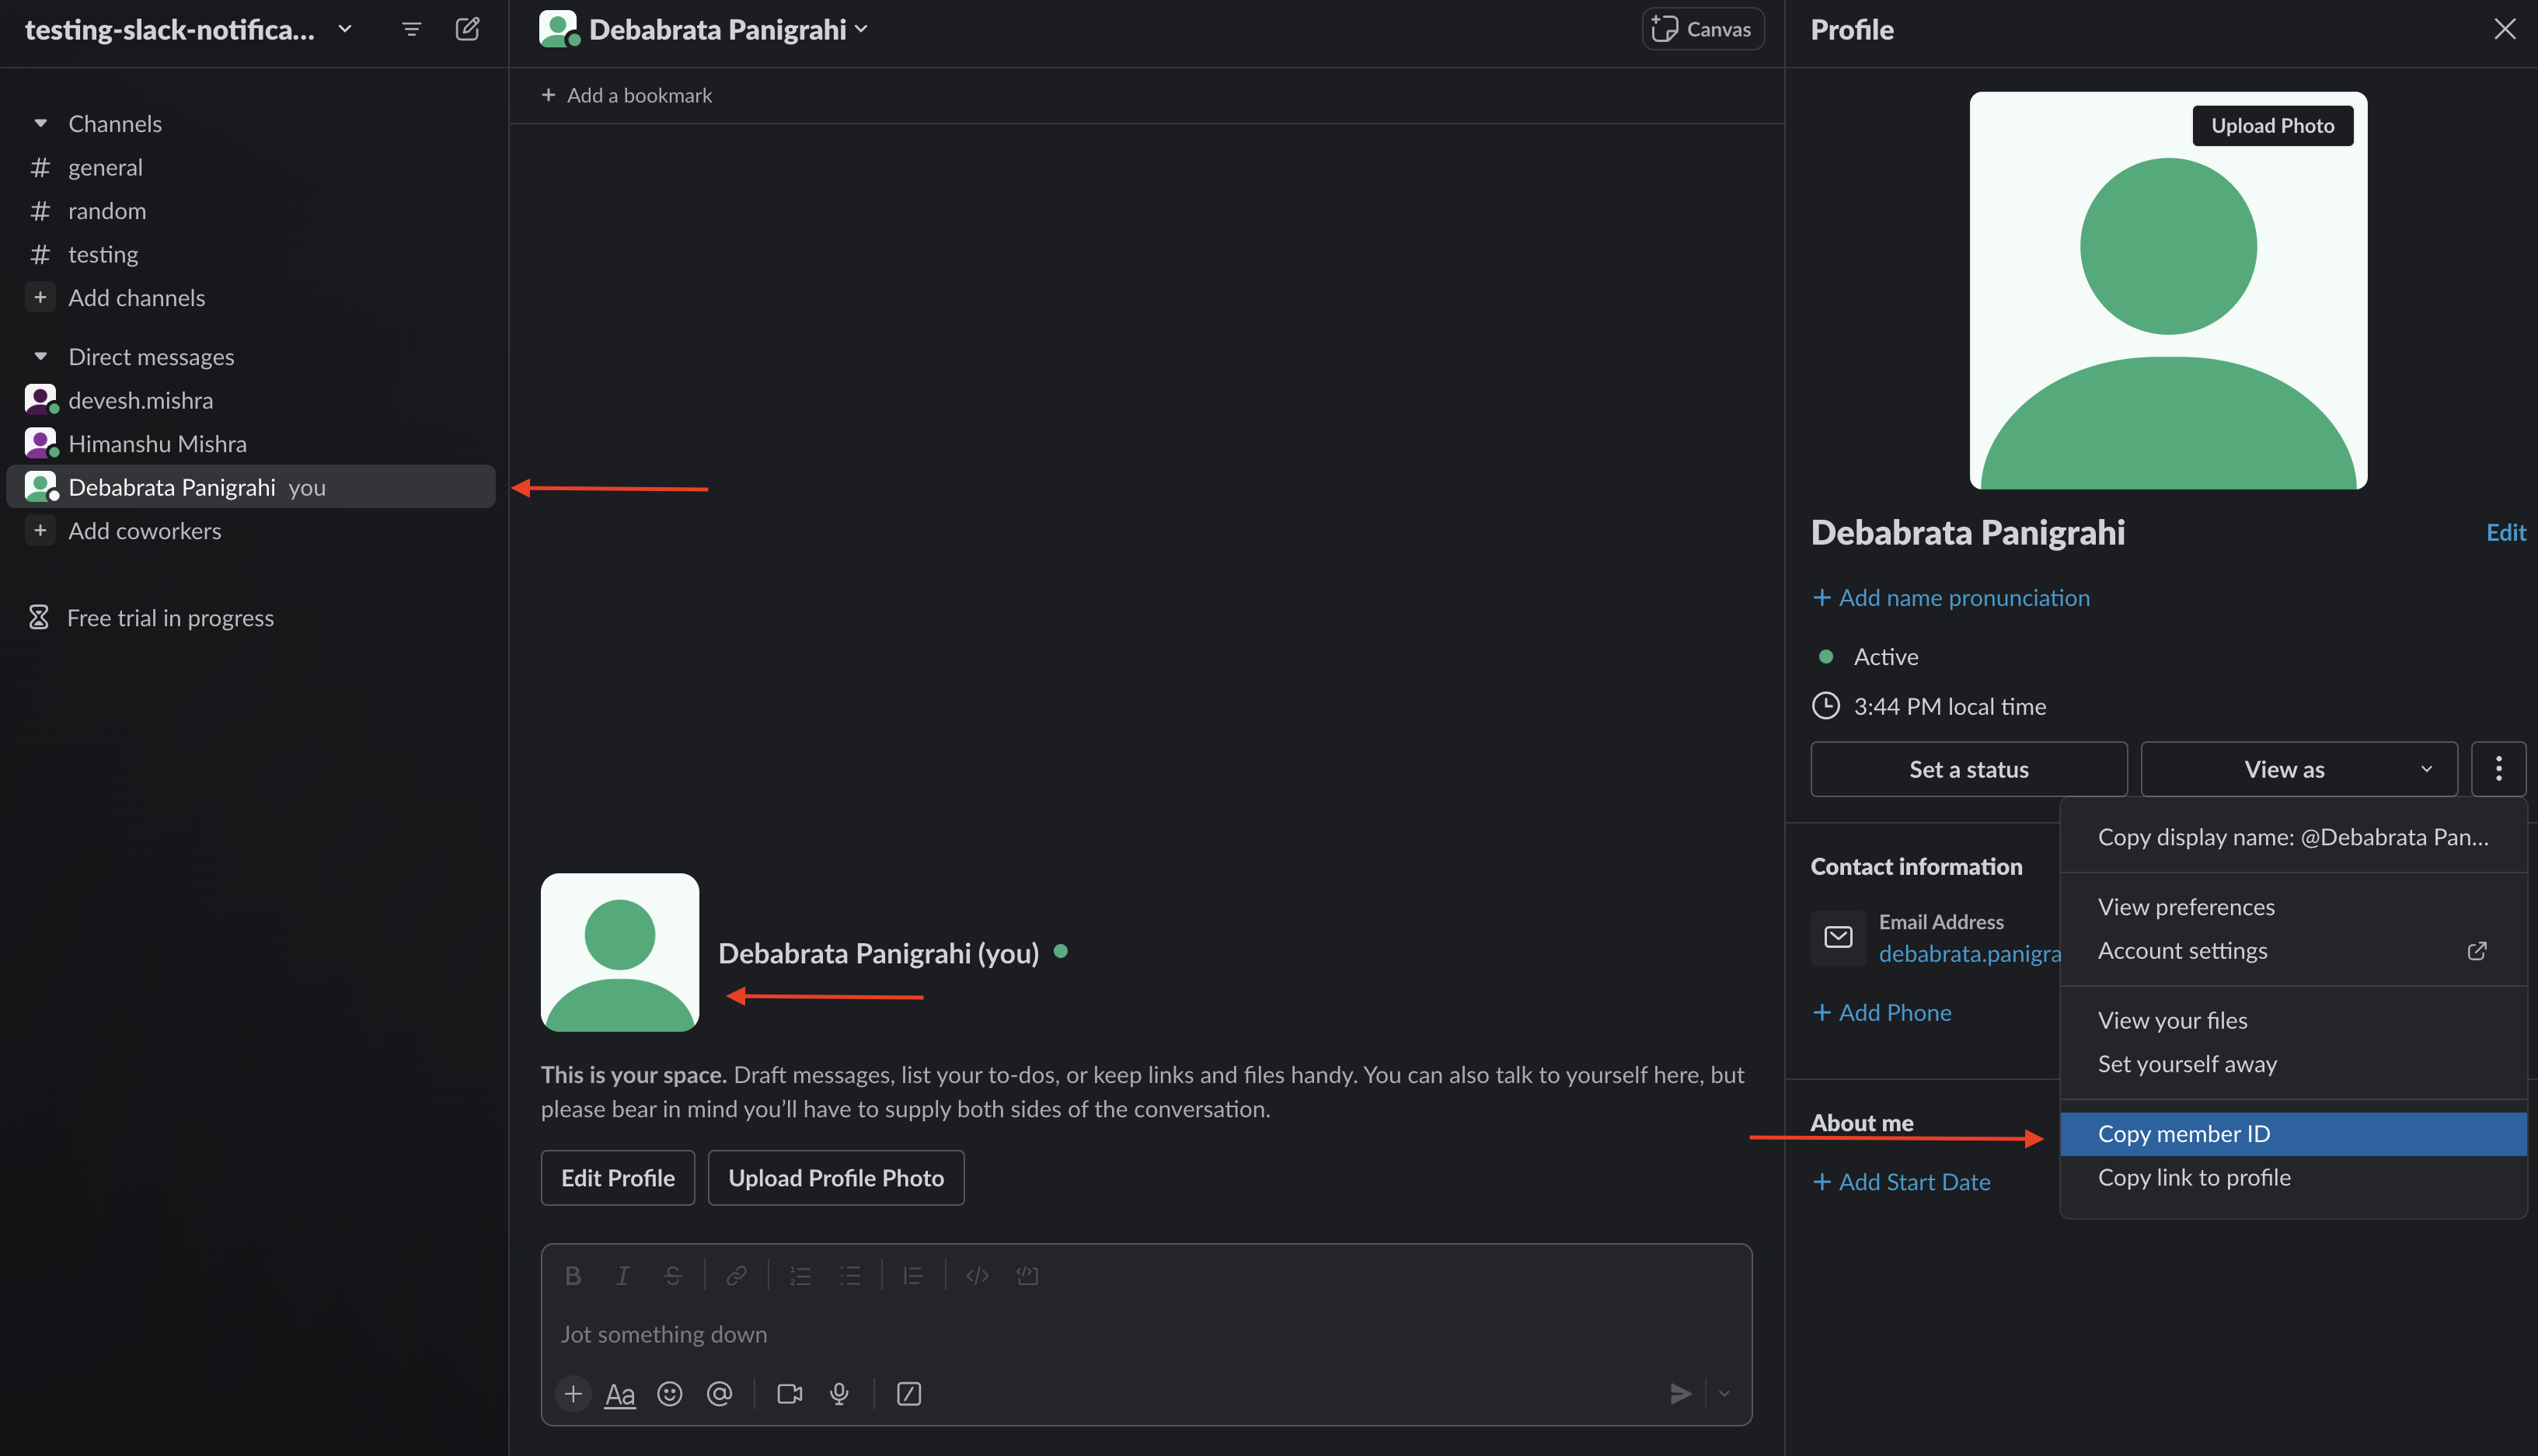
- Go to your team channel or individual slack space, click n the profile picture and got to details and copy the member ID
Slack secret key
The Slack Secret Key are the Bot-tokens created with the following permissions.
- chat:write
- chat:write.public
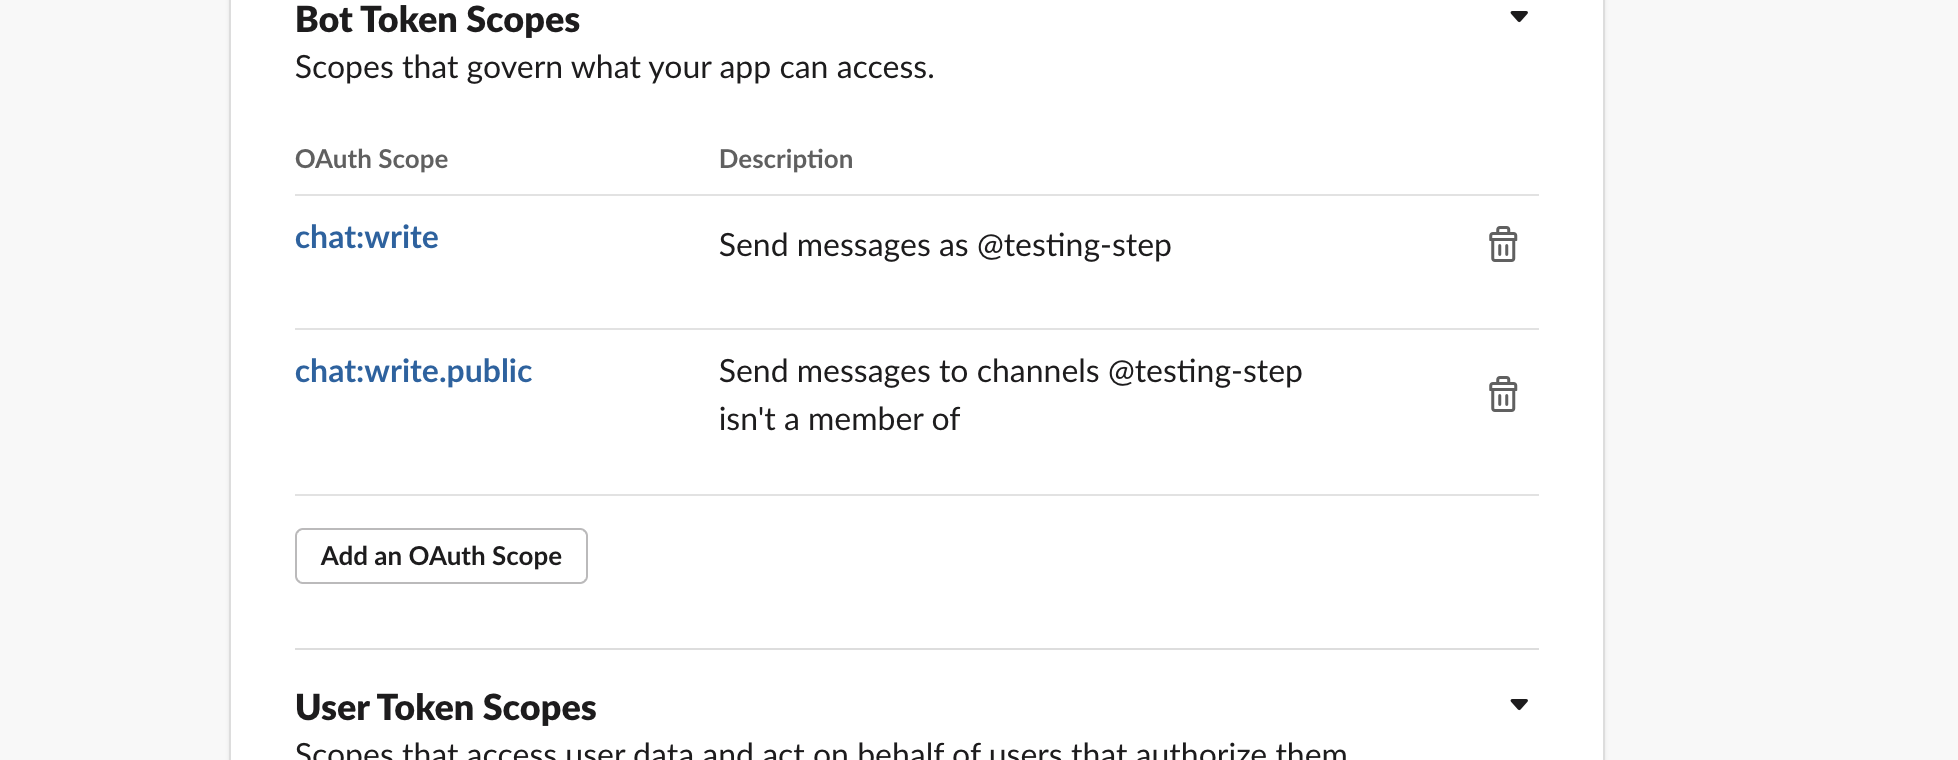
Read more on how to create bot-tokens.
Final Pipeline using Developer Portal Stage
We have been using Expression for most of the input values like <+pipeline.variables.slack_id> to be able to provide these values from the templates in the form of slack_id: ${{ parameters.slackid }}
Example
spec:
...
  parameters:
    - title: Service Details
      required:
        - slackid
        - triggerName
      properties:
        slackid:
          title: Insert your Slack ID
          type: string
          description: Your Slack Channel ID
...
...
  steps:
    - id: trigger
      name: Creating your react app
      action: trigger:harness-custom-pipeline
      input:
        url: ""
        slack_id: ${{ parameters.slackid }}
...
- YAML
- Pipeline Studio
pipeline:
  name: Self-Service-flow-repo-setup
  identifier: SelfServiceflowreposetup
  projectIdentifier: projctidp
  orgIdentifier: default
  tags: {}
  stages:
    - stage:
        name: service-onboarding
        identifier: serviceonboarding
        description: ""
        type: IDP
        spec:
          infrastructure:
            type: KubernetesDirect
            spec:
              connectorRef: idptest
              namespace: harness-delegate
              automountServiceAccountToken: true
              nodeSelector: {}
              os: Linux
          execution:
            steps:
              - step:
                  type: CookieCutter
                  name: CookieCutter
                  identifier: idpcookiecutter
                  spec:
                    templateType: <+pipeline.variables.template_type>
                    publicTemplateUrl: <+pipeline.variables.public_template_url>
                    cookieCutterVariables:
                      app_name: <+pipeline.variables.project_name>
              - step:
                  type: CreateRepo
                  name: CreateRepo
                  identifier: createrepo
                  spec:
                    connectorRef: account.testdev
                    organization: <+pipeline.variables.organization>
                    repository: <+pipeline.variables.project_name>
                    repoType: <+pipeline.variables.repository_type>
                    description: <+pipeline.variables.repository_description>
                    defaultBranch: <+pipeline.variables.repository_default_branch>
              - step:
                  type: CreateCatalog
                  name: createcatalog
                  identifier: createcatalog
                  spec:
                    fileName: <+pipeline.variables.catalog_file_name>
                    filePath: <+pipeline.variables.project_name>
                    fileContent: |-
                      apiVersion: backstage.io/v1alpha1
                      kind: Component
                      metadata:
                        name: <+pipeline.variables.project_name>
                        description: <+pipeline.variables.project_name> created using self service flow
                        annotations:
                          backstage.io/techdocs-ref: dir:.
                      spec:
                        type: service
                        owner: test
                        lifecycle: experimental
              - step:
                  type: DirectPush
                  name: DirectPush
                  identifier: directpush
                  spec:
                    connectorRef: account.testdev
                    repository: <+pipeline.variables.project_name>
                    organization: <+pipeline.variables.organization>
                    codeDirectory: <+pipeline.variables.project_name>
                    branch: <+pipeline.variables.direct_push_branch>
              - step:
                  type: RegisterCatalog
                  name: registercatalog
                  identifier: registercatalog
                  spec:
                    connectorRef: account.testdev
                    repository: <+pipeline.variables.project_name>
                    organization: <+pipeline.variables.organization>
                    filePath: <+pipeline.variables.catalog_file_name>
                    branch: <+pipeline.variables.direct_push_branch>
              - step:
                  type: SlackNotify
                  name: slacknotify
                  identifier: slacknotify
                  spec:
                    slackId: <+pipeline.variables.slack_id>
                    messageContent: " Hello <@<+pipeline.variables.slack_id>>, <+pipeline.variables.project_name> project is created using flows in Harness IDP,\\n*Created Catalog Yaml -* <<+pipeline.stages.serviceonboarding.spec.execution.steps.registercatalog.output.outputVariables.catalogInfoUrl>|Link>\\n*Created Repository -* <<+pipeline.stages.serviceonboarding.spec.execution.steps.createrepo.output.outputVariables.repositoryUrl>|Link>\\n*Registered Catalog -* <<+pipeline.stages.serviceonboarding.spec.execution.steps.createcatalog.output.outputVariables.registeredCatalogUrl>|Link>"
                    token: slacksecrettestws
          cloneCodebase: false
          caching:
            enabled: false
            paths: []
  variables:
    - name: test_content
      type: String
      description: ""
      required: false
      value: devesh
    - name: project_name
      type: String
      description: ""
      required: false
      value: <+input>
    - name: organization
      type: String
      description: ""
      required: false
      value: test-org-devesh
    - name: template_type
      type: String
      description: ""
      required: false
      value: <+input>.default(public).allowedValues(public,private)
    - name: public_template_url
      type: String
      description: ""
      required: false
      value: <+input>
    - name: repository_type
      type: String
      description: ""
      required: false
      value: <+input>.default(private).allowedValues(private,public)
    - name: repositoty_description
      type: String
      description: ""
      required: false
      value: <+input>
    - name: repository_default_branch
      type: String
      description: ""
      required: false
      value: <+input>
    - name: direct_push_branch
      type: String
      description: ""
      required: false
      value: <+input>
    - name: catalog_file_name
      type: String
      description: ""
      required: false
      value: catalog-info.yaml
    - name: slack_id
      type: String
      description: ""
      required: false
      value: <+input>